
PLANS: Available on GROW, ENTERPRISE
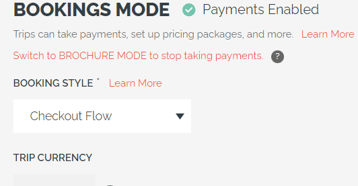
Setup: Set Trip to Bookings Mode -> Checkout Flow
WARNING: Pre-fill only works with Checkout Flow
- Update Trip → Pricing → Booking Style.
Call the /api/trip/addcheckoutdata endpoint. A sample request body is:
{
    "tripid": "564f0ad5-f79d-ed11-bf7a-14cb65328ad8",
    "firstname": "sample",
    "lastname": "traveler",
    "email": "sampletraveler@example.com",
    "phonenumber": "+61 4123456789",
    "packageid": "f1db6246-5135-eba1-bf7a-532bw8f13505",
    "source": "website",
    "room": "588",
    "arrivaldate": "2027-03-20",
    "departuredate": "2027-03-28",
    "taskresponses": [
        {
            "APIFIELDNAME": "date_of_birth",
            "VALUE": "1992-06-08"
        },
        {
            "APIFIELDNAME": "select_a_country",
            "VALUE": "AU"
        },
        {
            "APIFIELDNAME": "mini_bio",
            "VALUE": "I can't wait to join!"
        }
    ]
}
The request body for Checkout Prefill is quite similar to that of the AddRegistration Endpoint. However, since it’s only prefilling information of a traveler on a Registration Form, not all parameters in the AddRegistration endpoint will work for AddCheckoutData endpoint, for example, BillToCity, BillToCountry, SendConfirmation, RegistrationNote etc will be ignored in the AddCheckoutData endpoint.
Note:
-
Pre-select Package:
-
There are 2 ways where you can pre-select package
-
By passing package label to the url by adding ?package=[package label] to the url.
-
By passing packageid in the AddCheckoutData request body
-
-
If you’re doing the both, package label will override packageid in the request. To avoid confusion, it is recommended you pass packageid in the request body if you’re using AddCheckoutData endpoint.
-
-
Source:
-
Source in the request body will override source in the url parameter. To avoid confusion, it is recommended you pass source in the request body if you’re using AddCheckoutData endpoint.
-
-
Phone Number:
-
It is highly recommended that you format your phone number before passing it to the request body. By doing so, when you have a Profile Form Task setup on your trip, the phone number will be corrected split into Country Code and Phone Number and get populated into corresponding fields on checkout flow page.
-
The recommended phone number format is “+[country code] [phone number]“. Note there’s a space between country code and phone number. e.g. “+61 4123456789“.
-
- Category (optional)
- If your account has categories configured, then this can be passed
- If the category value provided doesn't match a configured category it will be ignored (starting from release 2.183) - no error will be shown, so be sure to test.
- Values ARE case sensitive
- Parameter name, with example of "Traveler" category
-
InviteeCategoryName=Traveler
-
If you are using Profile Form Task as your Registration Form, please note that data for Date of Birth and Mini Bio are passed in the taskresponse object in the request body.
NOTE: You can pass form fields based on API Field Names for tasks not included in the Registration form. These will be stored but not complete the tasks unless ALL required fields are complete.
If you have other custom fields added to your Profile Form Task and have correctly set API Field Name for those fields, you can also have them prefilled by adding them into the task responses object in the request body. Make sure you provide the correct API Field Name and value provided for a given task response field must match the given field type. For example:
-
"Single-line textbox" - simple text
-
"Multi-line textbox" - longer-format text
-
"Date picker only" - a valid date in the format yyyy-mm-dd
-
"Date + time picker" - a valid date in the format yyyy-MM-dd hh:mm:ss
-
"Select all that apply" - a pipe-separated list of values, where all values match one of the valid options - e.g. "Apples|Bananas"
-
"Select only one value" - a value that matches one of the valid options
-
"Checkbox" - true or false
-
"Radio Button (Yes/No)" - true or false
-
"Email" - an email address
-
"Select a country" - a country code (e.g "US", "AU")
-
"Date w/o picker (good for birthdates)" - a valid date in the format yyyy-mm-dd
- "International Phone Number" - a string in the format "+[Country Code] [Phone Number]" e.g. "+61 4123456789"
Step 2: Send your request
Authentication: Please refer to our API doco for authentication.
Http request: POST https://youli.io/api/trip/addcheckoutdata
The above request returns JSON structured like this:
{
    "Total": 1,
    "Warnings": [],
    "Results": "4b892d0f-4802-4060-b07d-7e08c3645ee8"
}
The "Results" value in the above JSON is your prefillid.
Step 3: Add the prefill id to the trip share link
Once you’ve got the prefill id, you can add that as a url parameter by adding ?prefillid=[your prefill id] to the url.
TIMEOUT: The prefillid is only valid for 5 minutes. The Checkout Flow page must be loaded in the customer browser before it expires. After that, no data will be prefilled. You can always fetch a new prefill id if required.
- https://youli.io/t/example-demo-company/an-amazing-trip?prefillid=[prefillid]
If you've done everything correctly, the fields on the form will be pre-filled for your customer. They can still edit and change the pre-fill values.
Need more help?
Reach out to the YouLi Support Team via the chat box at the bottom of your screen or submit a Support Ticket request. If you need more advanced support, schedule a 1:1 Consulting session with one of our experts, and we will walk through Traveler flow options & best practices.