
Available with any of the plans:
- Plus and Grow - Upgrade today to access
- Enterprise - contact Sales
Why do I need to use Tour Series?
There are a couple of reasons. You'll want to assign your TRIPS, TEMPLATES, and TRIP BROCHURES to a "Tour Series" in order to:
- Embed into one card on your website (with drop-down selection)
- Search on your dashboard for related trips that share an itinerary (coming soon)
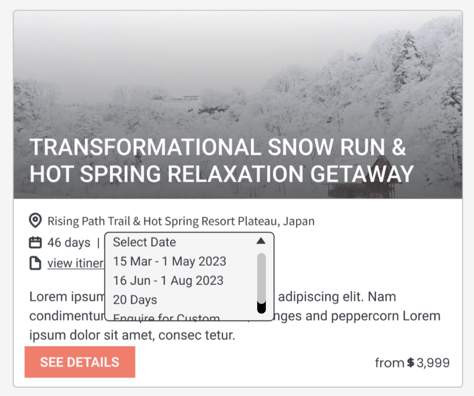
When TRIPS are assigned to the same TOUR SERIES and they are embedded on your website, instead of showing just ONE date, ALL available dates for a given Tour Series are shown in a dropdown.
These can be:
- Multiple set group departure dates of TRIPS
- You'll be able to easily move bookings between trips in the same Tour Series
- Sample ITINERARIES that prompt the customer to "Enquire for Custom Quote"
- From those inquiries, you'll be able to make copies of those Itineraries and then customize them for the prospect, turning a quote into a booking when you change from BROCHURE MODE to BOOKINGS MODE.
CAUTION: Tour Series is not having multiple departure dates within a single Package.
The next TRIP in the series is the Trip used to show the image/name and other embed card metadata.
Multiple departures for the same Itinerary
- Here's a real example of a tour operator using Tour Series for multiple departures: Pristine Trails has 3 different routes up Kilimanjaro and each one has multiple departure dates
- Each departure date is shown as an option in the drop-down. The Traveler can pick a date and then click "BOOK NOW" to be directed to the correct TRIP PAGE.

How-to: Optimize multiple departure registrations using Tour Series
- In the webinar below, we present the use cases of the TOUR SERIES feature by two amazing operators running multi-departure treks in Africa - Adventure out Loud and Pristine Trails.
- Watch the replay to learn the specifics of setting up and managing the Trips in a Tour Series, and updating pricing for different group sizes, details, and Packages.
How-to: Add a Trip to a Tour Series
NEW: As of August 2024, you can now add Tour Series yourself, within YouLi!
- Adding a TRIP or TEMPLATE to a TOUR SERIES is as easy as selecting it from the dropdown when creating/updating a Trip. Tour Series names cannot be longer than 100 characters.
- Once you set the TOUR SERIES on a TRIP or TEMPLATE, it will be copied to any Trips made from them, making it easy to create multiple departures from your master ITINERARY.
Start out by adding your Tour Series under your Account
- Go to ACCOUNT > LIBRARY > TOUR SERIES LIBRARY
- Click "ADD SERIES" and add in your TOUR SERIES

- Tour Series are sorted Alphabetically
- Now we show the Number of Trips (NUM TRIPS) disctinct from the Number of Templates (NUM TEMPLATES) so you can clearly.
- These counts exclude Archived Trips and Templates.
- The NUM TRIPS is now clickable and will take you to the dashboard filtered by the selected tour series.
- These counts include PAST Trips, but when you click the number, it will only display IN PROGRESS and FUTURE trips. To view past trips, you will need to manually select the PAST filter.
- For example, if I click on Destination Bali, which shows 7 trips, it will only display 3 IN PROGRESS and FUTURE trips. To see all 7 trips, including the past ones, I need to select the PAST filter.
Now, your Tour Series will show up under your Trips
- From UPDATE TRIP > OVERVIEW, scroll down to the TOUR SERIES section and select the Tour Series that your specific TRIP should be added to.

-
Now, just below that, scroll to the TRIP PRIVACY section and check the "PUBLIC" and "LISTED" checkboxes. "Listed" means you are listing the TRIP on the embed. Do this on any TRIPS that you're including in your TOUR SERIES.
- Finally, grab your code to embed your TRIP CARD into your website.
CAUTION: Tour Series does not work with the "Classic Embed" style. Make sure you use the embed code of the "Detailed Embed."
-
- To do this, click your "SHARE LINK" button (in the header) and navigate to the INTEGRATE WITH WEBSITE tab in the popup.
- Select "Classic"
- Copy the WEBSITE SNIPPET to embed into your website
How-to: Use Tour Series as folders (in your Trip Dashboard)
A Tour Series also acts like a folder. Once your trips are in a Tour Series, you can search by the name on your Dashboard to see ONLY the TRIP in that series.
TIP: You can even bookmark them since the query stays in the location, see example link to bookmark below. Just use your browser's bookmark feature.
https://youli.io/?q=Jordan
Sample itineraries: "Enquire for Custom Quote"
- You can also use Tour Series to set up a brochure that can be used to collect custom quote requests.
- Simply create a TRIP from your itinerary template in BROCHURE MODE. Then add it to your Tour Series and make it "PUBLIC & LISTED."
- Be sure to set your WHEN field on the TRIP OVERVIEW to "Enquire for Quote" or whatever your preferred call to action. It will then appear under all the set departure dates in the drop-down on your embedded TRIP CARDS on your website.
- When the Traveler selects it, they will be directed to the BROCHURE MODE TRIP where they can submit their enquiry, you'll receive an email when they submit and you can process their request.
- We recommend making a PRIVATE TRIP from your ITINERARY TEMPLATE and then creating a personalized version of the TRIP from there until you are ready to set the price and switch the Trip to BOOKINGS MODE to take payment.