How-to: Personalize a Travelers Trip Page on a Group Trip
There are many ways to customize Trips for your Travelers (whether they are traveling solo, in a group or have a shoulder trip planned!). Learn the best ways to do it!
Personalized Price
For a Traveler who has not yet registered for your Trip
1. Under MANAGE PEOPLE click ADD PERSON
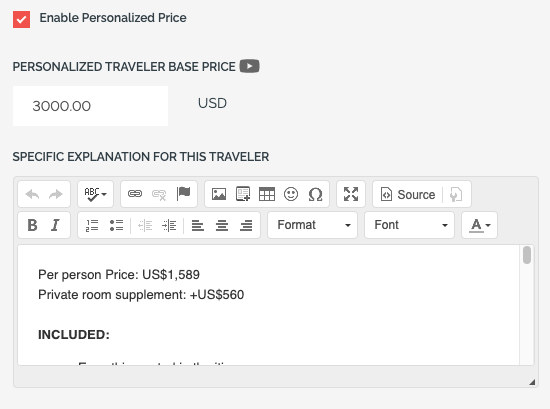
2. Scroll down in the pop-up and click the checkbox ENABLE PERSONALIZED PRICE
3. Add in their PERSONALIZED TRAVELER BASE PRICE
4. Add in a SPECIFIC EXPLANATION FOR THIS TRAVELER
NOTE: This information will show up on their invoice, so it's very important that you add an explanation that describes why their Personalized Price is the rate that it is (whether that's more or less than the price of the Package they're on).

4. Click ADD (to complete adding the Traveler)
TIP: You can now share a Magic Link with your Traveler & they will see that they are invited or registered (depending on what status you chose for them) and they will see this personalized price & explanation under their invoice.
For a Traveler who has already registered for your Trip
1. Under MANAGE PEOPLE, find your Traveler and click EDIT
2. Now walk through steps 2-4 above!
Extra Package options that are hidden, but can be assigned by the Planner
Do you have a Traveler who needs to have a special PACKAGE, which should only be visible to them? Here's how to set that up!
First, create a hidden Package
CAUTION: Make sure you are in Bookings Mode so that you can add a Package (or edit an existing Package!)
1. Under UPDATE TRIP, click on the PRICING tab
3. Click on the ADD PACKAGE button or click MANAGE > EDIT under an existing package
4. Scroll down to VISIBILITY and choose HIDDEN FROM TRAVELERS from the dropdown (this PACKAGE will no longer be visible/an option for anyone who hasn't already signed up for it)
Now assign the Package to a Traveler
OPTIONAL: If you haven't added your Traveler to the trip already, you should do this by clicking MANAGE PEOPLE > ADD PERSON and fill out your Traveler's information, to register them for the trip
5. Under MANAGE PEOPLE find your Traveler and click EDIT
6. Open the dropdown under PACKAGE and select your HIDDEN PACKAGE
7. Click UPDATE
Now your Traveler will see the PACKAGE on their invoice and it will be hidden from all other Travelers!
Packages can be linked to categories - so when they are selected and booked, the Trip Page Itinerary and Tasks change based on the category
If you have Traveler Categories in your account, you can link a package to a Category, so the Traveler is automatically added to that Category when they book.
Then when they view they view their Personalized Trip Page, it will show them Highlight & Itinerary Items and Task Items just for their Category.
This can be handy if you have different inclusions based on categories being: "Speaker" vs. "Attendee" or even if you want to do categories of "Standard" vs. "With Extension", so you can offer packages that have different tasks/itinerary items when they select the extended tour package.
Learn more about using Traveler Categories
Personalized arrival & departure dates
See here for our help article, which will guide you to personalize your arrival & departure dates for certain Travelers
Highlight & Itinerary Items that are visible to certain people or exclude certain people
- Under MANAGE HIGHLIGHTS & ITINERARY, click ADD ITEM
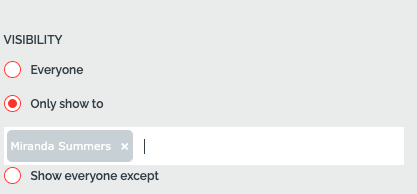
- Scroll down to VISIBILITY
- See the options in the image below
- The default is that a Highlight/Itinerary Item is visible to everyone
- Instead, you can choose to "Only show to" and add in your Traveler(s) who should see this particular item
- Or you can choose "Show everyone except" and add in your Traveler(s) whom you'd like to hide this item from

If you have the Traveler Categories feature, the option will appear to limit visibility based on the Category, like this:

4. Make sure to fill out all of the other details for the item and click the PUBLISH button
NOTE: If you've already created a Highlight/Itinerary Item that you want to share with certain people, click EDIT below the item and walk through the steps above
Tasks & Custom Forms which are visible (to) or hidden (from) certain Travelers
- Under MANAGE TASKS & CUSTOM FORMS, click ADD TASK
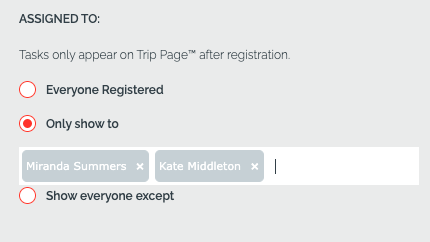
- Fill out all information for your TASK & find the ASSIGNED TO section (see image)
- Select "Only show to" and start adding Travelers that you'd like to show the Task to. OR if you want this task hidden from some Travelers, choose "Show everyone except."

If you have the Traveler Categories feature, the option will appear to limit assignment based on the selected Categories, like this:

NOTE: The default setting for task visibility is "Everyone Registered"
Need more help?
Reach out to the YouLi support team via a chat box at the bottom of your screen or submit a ticket request. If you need more advanced support, schedule a 1:1 Consulting session with one of our experts, as we will walk you through the features and best practices.
