
Your Account settings control your personal profile, business information, branding, Trip Page defaults, payments, and team access. Some settings apply to every Trip owned by your team, so it is best to configure them before going live.
NOTE: To access your Account click on your name (Avatar) in the top right of the screen then click "Account" from the drop-down.
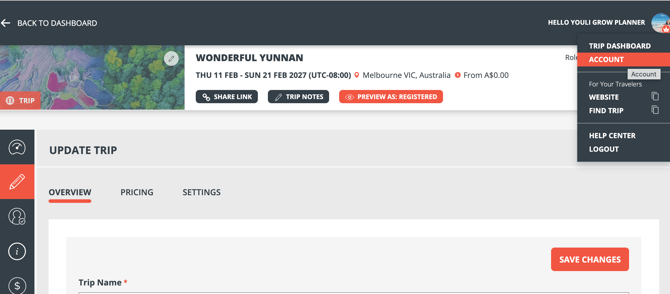
Open ACCOUNT from the left navigation. You will see:
- Profile
- Third Party Cards
- Business Profile
- Site Settings
- Categories
- Payments
- Team Members
- Affiliates
NOTE: The options available to you may depend on your YouLi plan and user role.
Step 1: Update Your Profile
Your Details
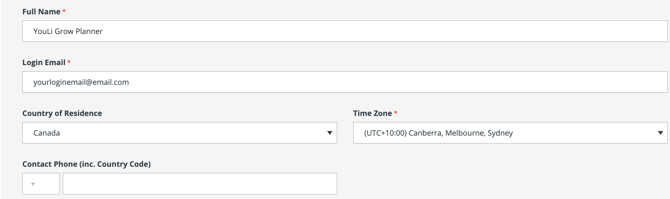
Go to ACCOUNT > PROFILE.
The Profile tab contains your personal user details. These settings belong to your login, not your entire business.
-
Avatar: Your personal profile image. This helps other users identify you.
-
Full Name: The name connected to your YouLi user.
-
Login Email: The email address used to log in and receive account-related communication.
-
Country of Residence: Your personal country or region.
-
Time Zone: Controls how dates and times are displayed to you across YouLi.
-
Contact Phone: Add your country code and phone number.
- Don’t forget to hit 'SAVE!'
If you are assigned as a Trip Page Contact, some of your Full Name and Login Email information will be shown to Travelers. Always check the Trip Page Contact assigned to each Trip. More information about contacts here.
NOTE: If you are the Trip Owner or Main Contact, this is the contact info that will be used to send automated reminders and confirmations.
Subscription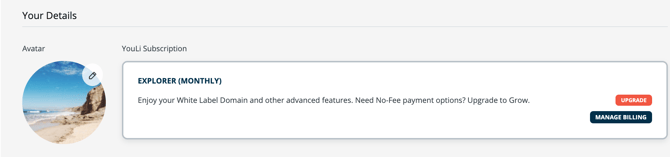
Your current YouLi subscription is displayed at the top of the Profile page.
Use UPGRADE/MANAGE BILLING to review the billing options available to your account. If the subscription information is incorrect or displays an error, contact YouLi Support.
Security
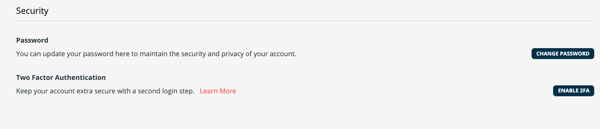
Under SECURITY, you can change your password and enable Two Factor Authentication.
TWO FACTOR AUTHENTICATION, or 2FA, adds a second login step using an authenticator app. This helps protect Traveler, Trip, and payment information if your password is compromised.
When enabling 2FA:
- Choose an authenticator app.
- Scan the code shown by YouLi.
- Enter the authentication code.
- Save your backup codes somewhere secure.
IMPORTANT: Backup codes can help you access your account if you lose your phone or authenticator app.
👉 Learn more: How-to: Setup 2FA - Two Factor Authentication
Click SAVE CHANGES after updating your Profile.
Step 2: Complete Your Business Profile
Go to ACCOUNT > BUSINESS PROFILE.
The Business Profile contains information about your organization. It can be used across your Trip Pages, business profile, website features, and other customer-facing areas.
Business Info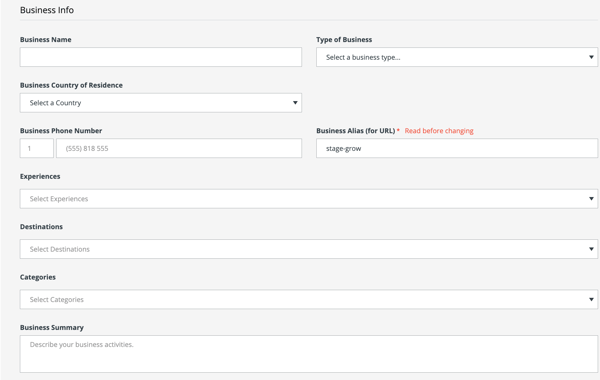
-
Business Name: Your company or organization name. and it will show in the header in the contact tab of all your trip pages.
-
Type of Business: Select the option that best describes your business.
-
Business Country of Residence: The country where your business is based.
-
Business Phone Number: The main contact number for your business.
-
Business Alias: The unique value used in your YouLi links.
- ⚠️Your BUSINESS ALIAS is used in the branded links created by your account.
This can include:
-
Public Trip Links
-
Magic Links
-
Invitation links
Choose an alias that is short, recognizable, and connected to your brand. It cannot contain spaces or unsupported special characters.
-
-
⚠️ WARNING: Changing your Business Alias can break links that have already been shared. Get Started: Setting Up Your Business Alias
If you have already sent invitations, shared Trip links, or connected a Starter Website domain, do not change your Business Alias without contacting YouLi Support.
- ⚠️Your BUSINESS ALIAS is used in the branded links created by your account.
-
Experiences: Select the types of experiences you offer.
-
Destinations: Select the destinations your business serves.
-
Categories: Choose the categories that describe your business.
-
Business Summary: Write a short description of what your business does.
Experiences, Destinations, Categories, and the Business Summary help describe your organization. Keep this information current and consistent with your website.
Branding
The Branding section controls the main visual assets associated with your business.
-
Logo: Upload your standard business logo.
-
Community/Rounded Logo: Upload a compact logo suitable for rounded or smaller layouts.
-
Profile Banner Image: Add a wide image that represents your business.
-
Website URL: Add a link to your main website.
-
Promo Video URL: Add a YouTube video introducing your business.
-
Business Promo: Add formatted promotional content for potential customers and partners.
When a Traveler clicks your logo on supported pages, they may be directed to your Website URL. Make sure the link is complete and working.
Use clear, high-quality images that match your current brand. Preview your pages after uploading new assets.
👉 Learn more: How-to: Add your Logo, Favicon, Colors, & Font
Contact Methods
Add links to the public profiles you want customers and partners to visit:
-
Facebook Page
-
Instagram Profile
-
Twitter/X Profile
-
YouTube Channel
-
LinkedIn
-
Other Social Link
Use full URLs and test each link before saving.
Click SAVE CHANGES.
Step 3: Configure Your Site Settings
Go to ACCOUNT > SITE SETTINGS.
Site Settings control account-wide branding and default behavior for your Trip Pages and supported YouLi website features.
Branding Appearance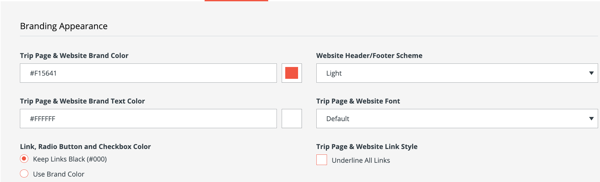
Choose your default:
- Trip Page & Website Brand Color: The main color used across supported buttons and design elements.
- Trip Page & Website Brand Text Color: The text color displayed against your brand color.
- Website Header/Footer Scheme: Controls whether the website header and footer use a light or dark appearance.
- Trip Page & Website Font: Sets the default font.
- Link, Radio Button and Checkbox Color: Keep these elements black or match them to your brand color.
- Trip Page & Website Link Style: Choose whether links are underlined.
Use colors with enough contrast to keep buttons, links, and text easy to read. Preview the website after making changes.
Trip Page Authentication Settings

These settings control when Travelers must log in.
Choose one of the following:
- No Login Required: Travelers can access their Personalized Trip Page using a Magic Link after booking.
-
Login Required After Booking: Travelers can book without logging in but must log in to access their Personalized Trip Page afterward.
-
Always Require Login: Travelers must log in before booking and whenever they access their Personalized Trip Page.
-
select this option if:
-
You have Platform White Label and loyal customers
-
You want to drive more adoption of AutoPay during Checkout
-
-
A MAGIC LINK is a personalized link that gives a Traveler access to their Trip Page without requiring a password.
Magic Links should only be sent to the correct Traveler. Anyone with access to the link may be able to see that Traveler’s personalized information.
Choose the authentication option that matches your privacy requirements and preferred booking experience.
YouLi Trip Pages & PRO+ Website
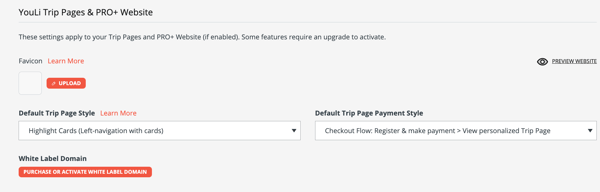
This section contains defaults used by your Trip Pages and PRO+ Website, when enabled.
- Favicon: The small icon shown in browser tabs and bookmarks.
-
If you're considering purchasing a PWLD, please keep this information up to date before configuration to ensure that travelers searching for your site in a browser see the correct favicon.
-
- Default Trip Page Style: Sets the default layout for new Trip Pages.
- Default Trip Page Payment Style: Controls the default booking and payment journey.
- White Label Domain: Allows eligible accounts to use a supported custom domain.
- Preview Website: Opens a preview of your current starter website.
Some features require an eligible plan or add-on. Existing Trips may retain their own settings, so review important Trips individually after changing an account default.
Tracking Configuration
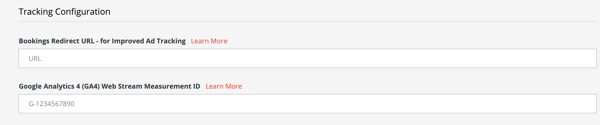
Use this section to configure post-booking tracking.
- Bookings Redirect URL: Sends a Traveler to another webpage after completing a booking. This can be used for conversion tracking, a thank-you page, or a marketing workflow.
- Google Analytics 4 Web Stream Measurement ID: Connects supported YouLi pages to your GA4 web stream. A GA4 Measurement ID normally begins with
G-.
Test your redirect using a test booking before launching. An incorrect URL can interrupt the Traveler’s post-booking experience.
After adding a GA4 Measurement ID, confirm that events are reaching the correct Google Analytics property.
Starter Website Configuration
This feature is scheduled to be retired soon...
Trip Registration Settings
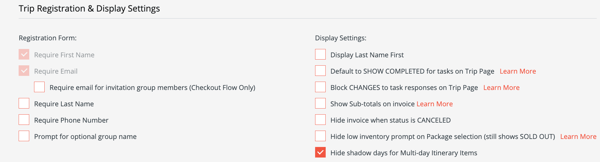
Choose which details Travelers must provide during registration (Brochure mode Trips or Bookings mode trips withREGISTER TO PAY / TRIP PAGE CHECKOUT FLOW).
Available options include:
- Require First Name
- Require Email
- Require email for Invitation Group members using Checkout Flow
- Require Last Name
- Require Phone Number
- Prompt for an optional group name
First Name and Email are required by default in the displayed configuration.
Collect only the information needed for your booking and operational process. Additional information can be collected later using Tasks and Forms.
If your Trips do not include a Profile and Registration Task Form, the required fields will be displayed.
Display Settings
Display Settings control how information appears or behaves on Trip Pages.
Options include:
-
Display Last Name First: Changes the order used when displaying Traveler names.
-
Show Completed Tasks by Default: Opens the Traveler’s Task list with completed Tasks visible.
-
Block Changes to Task Responses: Prevents Travelers from changing submitted responses from the Trip Page.
-
Show Subtotals on Invoice: Displays subtotals on Traveler invoices.
-
Hide Invoice When Status Is Canceled: Removes the invoice view for canceled Travelers.
-
Hide Low Inventory Prompt: Hides low-stock messaging while still showing “Sold Out” when inventory is exhausted.
-
Hide Shadow Days: Hides additional shadow days associated with multi-day Itinerary Items.
These settings become account-wide defaults. Check individual Trips if they require different behavior.
PDF Confirmation Settings
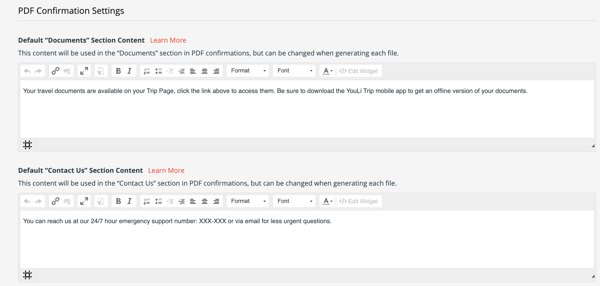
Set the default content used in PDF Confirmations.
- Documents Section Content: Explain how Travelers can access or download their travel documents.
- Contact Us Section Content: Provide contact instructions, including emergency information when appropriate.
This content is used as a default and can be changed when generating an individual PDF Confirmation.
Do not leave placeholder contact details in the final content.
Flight Search and Book
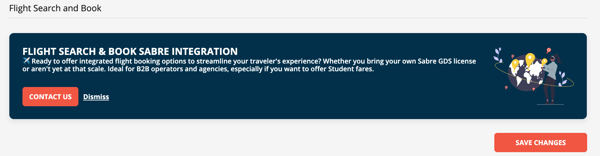
Eligible accounts may see information about an integrated Sabre flight-booking solution.
CONTACT US to discuss requirements and availability, or dismiss the notice if the integration is not relevant to your business.
Click SAVE CHANGES
Step 4: Set Up Categories
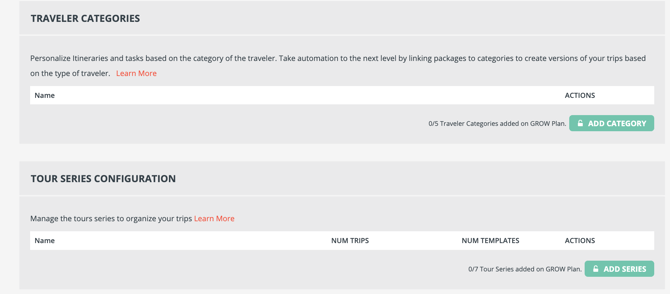
Categories Configuration
Categories help automate and organize your Traveler and Trip setup.
Use TRAVELER CATEGORIES to create different experiences for different types of Travelers.
For example, a category may represent:
-
Traveler type
-
Package type
-
Group
-
Department
-
Program
-
Experience level
Categories can be used to show different Tasks, Itinerary Items, or Packages to different Travelers.
Select ADD CATEGORY to create one. The number of Traveler Categories available depends on your YouLi plan.
Tour Series Configuration
Use TOUR SERIES to organize related Trips and Templates,
A Tour Series helps you group repeated departures or Trips within the same program, display those departures in a single embedded card on your website, and organize the Trips on your dashboard.
-
Series Name
-
Number of Trips
-
Number of Templates
-
Available Actions
Select ADD SERIES to create one.
The number of Tour Series available depends on your plan.
Step 5: Connect Your Payment Gateway
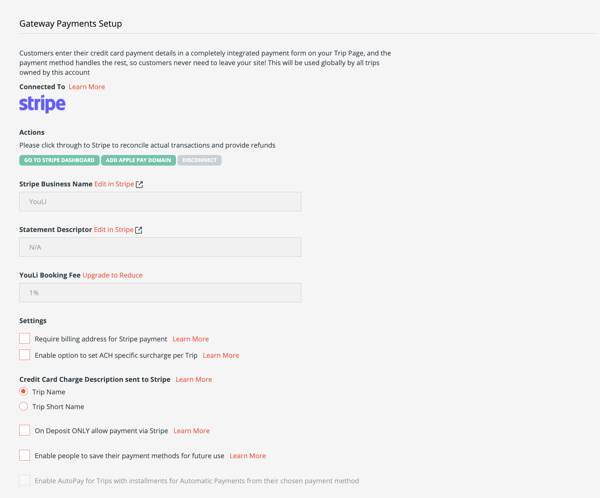
The Payments tab contains account-wide payment gateway and payment automation settings. Changes here may affect all Trips owned by the account.
Only the Team Owner or Team Admin or an authorized Customer Role should change these settings.
Gateway Payments Setup
Connect Stripe to accept credit card payments through your Trip Pages.
If you use Square, connect it to YouLi to accept credit card payments through your Trip Pages.
When Stripe is connected, you can:
- Open the Stripe Dashboard
- Add an Apple Pay domain
- Review the Stripe Business Name
- Review the Statement Descriptor
- View the current YouLi Booking Fee
- Disconnect the gateway
The STATEMENT DESCRIPTOR helps Travelers recognize the charge on their card or bank statement. It is managed in Stripe.
Refunds and transaction reconciliation may also require access to the Stripe Dashboard.
👉 Learn more: How-to: Connect Your Stripe Account to YouLi
Gateway Settings
Depending on your configuration, you can control:
-
Whether Stripe payments require a billing address
-
Whether Trips can apply an ACH-specific surcharge
-
Whether the Trip Name or Trip Short Name is sent as the charge description
-
Whether AutoPay is available for installment payments
AUTOPAY automatically charges a saved payment method according to an installment schedule. It should only be enabled when your booking terms clearly explain the payment authorization.
Automatic Late Fees
When enabled, YouLi can automatically add a fee after an installment becomes overdue.
Configure:
- Late fee amount
- Reminder message
- Number of days after the due date
- Late fee confirmation message
The reminder message should clearly explain when the fee will apply. The confirmation message should tell the Traveler that the fee has been added.
⚠️ WARNING: Confirm that your Terms & Conditions and applicable laws allow the fee before enabling it.
Automatic Cancellation
When enabled, YouLi can warn and cancel a booking after an installment remains overdue.
Configure:
- Days before sending the cancellation warning
- Cancellation warning message
- Days before automatic cancellation
- Cancellation confirmation message
The warning must be scheduled before the automatic cancellation date. Use clear language so Travelers understand what they must do to keep their booking.
Default Bank Transfer Instructions
Add the instructions Travelers need when paying by bank transfer.
These instructions can be used as a default for Trips created by your team. Eligible users can update the instructions on an individual Trip when needed.
Bank transfers happen outside YouLi. After receiving the funds, an authorized user must record or mark the payment as received.
👉 Learn more: How-to: Accept Direct Payments | Bank Transfer
Bookings Email
Enter a business email address to receive a copy of sent Traveler receipts.
Use a monitored team inbox if multiple people manage bookings and payment reconciliation.
Catchup Payments
Catchup Payments help a Traveler pay multiple outstanding installments.
Choose whether payments marked DUE SOON should be excluded from the Catchup Payment amount.
Trip Packages
Enable supported fees and taxes on Packages when this is required by your pricing setup.
Review the final Package total and Traveler invoice before launching.
Chip Away Payments
CHIP AWAY PAYMENTS allow Travelers to make flexible partial payments instead of paying only the scheduled amount.
Choose whether this is available to:
- Individual Travelers enabled by a Planner
- All Travelers after paying a deposit
You can also customize:
- Chip Away invoice prompt
- Minimum Chip Away payment amount
The minimum is entered in the currency of the Trip.
Click SAVE CHANGES after reviewing all payment settings.
Step 6: Add Your Team
-
Name and email
-
Role
-
Trip access
-
Recent activity
-
2FA status
-
Available actions
Use the Activity and 2FA columns to review account access regularly.
Internal Roles
Internal users are added to your Account and may have access across multiple Trips.
Internal roles include:
- Team Owner: Owns the team account and its Trips.
- Team Admin: Has broad account and Trip management access.
- Team Member: Works across the Trips available to the team.
- Custom Role: Has permissions defined through Role-Based Access Control.
External Roles
External users are normally added to an individual Trip.
External roles include:
- Co-Planner
- Trip Coordinator
- Custom Role
A Co-Planner or Trip Coordinator is not automatically a Team Member.
Select ADD USER or ADD TEAM MEMBER to invite someone. Confirm their role and Trip access before sending the invitation.
Only give users the access they need.
👉 Learn more: Understanding All User Roles
The number of Team Members available depends on your YouLi plan.
Step 7: Review Affiliates
Go to ACCOUNT > AFFILIATES.
Affiliate Profiles help organize Trips connected to partner organizations, clients, or affiliate relationships.
The table displays:
- Affiliate Name
- Short Name
- Number of Future Trips
- Available Actions
The SHORT NAME is a compact identifier used to distinguish the Affiliate Profile.
Select ADD AFFILIATE PROFILE to create one. Review the Affiliate Profile before connecting it to live Trips.
Final Account Check
Before sharing your first Trip Page:
- Confirm your name, email, Time Zone, and phone number
- Enable 2FA and store your backup codes
- Complete your Business Profile
- Check your Business Alias before sharing links
- Upload your logo and banner
- Preview your colors, font, and link style
- Choose the correct authentication setting
- Add your GA4 Measurement ID if required
- Review registration and display defaults
- Connect and test your payment gateway
- Review late-fee and cancellation automation
- Confirm Team Member roles and access
- Click SAVE CHANGES on every page you update