

So you've created your Trip and you think it's ready to go. This checklist will help you make sure you haven't missed anything before you share it with your audience.
Have you created a Trip yet?
If you haven't created a trip yet, follow our quick and easy guide to create your first trip. Otherwise, continue reading!
Step 1. Review the Trip Settings
In this step, you will be confirming your TRIP DATES, TRIP PRIVACY, TRIP DESCRIPTION, TRIP PRICING & the other big overarching details of your trip.
Click on UPDATE TRIP in the NAVIGATION MENU on your left-hand side, From here you will be able to edit the OVERVIEW, PRICING & SETTINGS of your trip even while it is live.

- TRIP PRIVACY - If you had this private while creating, now might be the time to make it public and listed.
- TRIP DATES - Double check your dates are correct. You can have estimated "BROCHURE" dates or "SET DEPARTURE" dates. Having Set Departure dates means a date bar will appear on your Trip Page for Travelers.
NOTE: Make sure this is in line with the trip dates. The close date will automatically appear in the text, so be sure not to repeat it.
We recommend linking your Trips to YOUR website or a YouLi PRO Website (formerly PRO Plug N Play website) you host on YouLi.
- CLOSE REGISTRATIONS DATE - You have the option to set a date when Travelers are no longer able to register.
- TRIP DESCRIPTION - Clean it up and remember that less is more. Did you add a video?
- TRIP BANNER - ensure your trip stands out when shared with the best quality banner image.
Under the PRICING tab review your PRICING PACKAGES:
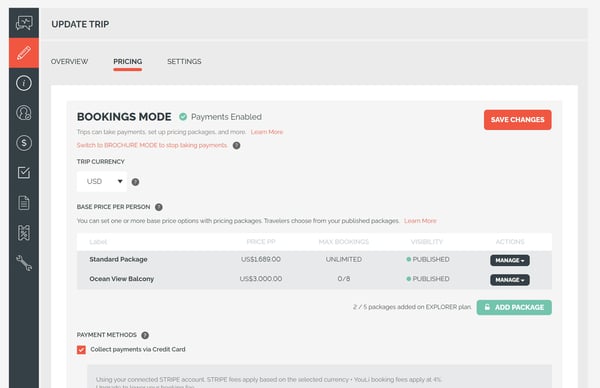
SWITCH TO BOOKINGS MODE if you are ready to collect payments. It is here that you will be able to create instalment pricing for your travelers, activate discounts by setting an individual price and describe all that is included in the TRIP PRICING.
Check out the YouLi How-To videos for a more detailed walkthrough of...
- The Cost Explanation and Cost Menu on the YouLi Experience
- How to Set an Individual Price for each Person
- How to Change Instalment Percentages to a Fixed Payment
Under the SETTINGS tab review your Trip Page language :
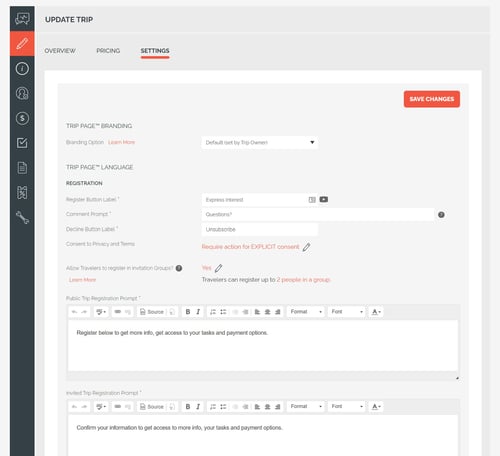
- SETTINGS - This important tab has all the default text that you can change to make the Trip Page™️ feel like YOUR page.
- REGISTRATION PROMPTS - Personalize your registration prompts. In this section also personalize the 'call to action' button where people will click to register for your trip.
- MENU LABELS - These are the labels that your Travelers will see on the left side of your trip and will help them navigate all of the information. For more information on how to customize your Trip Page Menu and control what your travelers see, explore this detailed How-To Customize your Trip Page Menu article which goes into detail on each section of the page.
- DEFAULT EMAILS - It is here that you can personalize the emails that will go out when you invite travelers, when they register, and if they decline.
TIP: Did you know? You can share the public trip to just yourself on Facebook to see how it would look to Travelers before sharing publicly. Look for the "Share with myself" option when posting.
Step 2. Review the Highlights & Itinerary
While reviewing your HIGLIGHTS & ITINERARY, you will be able to emphasize your cause, a partner, a guide profile and confirm your detailed summary and details of the trip for your travelers.
- HIGHLIGHT ITEMS - Shown on the first section of the Trip Page™️, these always appear with large images. These are key reasons people will want to join your trip. The big 'Highlights'. They can also be shown on the Itinerary section.
- ITINERARY ITEMS - In this section, you can create day by day summaries, or detailed hour by hour activities. These appear with a small image and all text shown at once. You can feature these in the Highlight section too.
- IMAGES - How do they look when you select show all on the Highlights page? Tinker with image sizes to work on any issues. All images are adjusted to fit on mobile automatically. 👍
- OPTIONAL ITEMS - Highlight and Itinerary Items can be optional. Travelers will be able to choose to attend these items or opt-out. Use this for add-ons or optional dinners.
Use the PREVIEW function to ensure your HIGHGHLIST & ITINERARY show how you want them to for your traveler.
Step 3. Finalize Price and Payments
While reviewing price and payments, you will be double-checking PRICING, PRICING EXPLANATION, INSTALLMENTS and PAYMENT METHODS.
- If you're using YouLi to collect payments: switch to BOOKINGS MODE to finalize the total cost of the trip. Double-check the numbers!
- Be sure to update the PRICING EXPLANATION to mention any optional or additional costs which may not be included in the total price and to reference your cancellation policy.
- INSTALLMENTS - If you would like to get a deposit from your Travelers you can add an INSTALLMENT. You can set the deposit as a percentage of the total cost or a set amount.
Step 4. Tasks & Resources
TASKS & RESOURCES is where you will be able to manage all documentation and things you need your Travelers to do before the trip.
NOTE: Have you included all the required TASKS? Check to be sure you didn't make them as itinerary items or put them inside descriptions on accident.
- ✅ If you want it DONE, make it a TASK: anything the Traveler is required to provide or complete can be a task.
- REMINDERS - With YouLi you can set reminders for TASKS. No one wants to complete a long registration form and no one reads the FAQ - but YouLi's automated reminders ensure they get their TASKS done. 👍
- Click through to complete TASKS as a Traveler to ensure the completion method is correct.
Double-check any attached resources aren’t out of place or missing context.
Step 5. Ready to Publish Your Trip
Let's roll it out! Time to make it live!
Preview the Trip as a Traveler once more to catch any final details.

Remember that a TRIP PAGE changes depending on the status of the person viewing it. Try out the important ones so you have confidence you've created the right experience:
- PUBLIC TRIP - open a new "Private" or "Incognito" window and paste in the SHARE TRIP LINK to see what an anonymous person would see
- INVITED - Add a person under "MANAGE PEOPLE" with "Going?" = "Not Responded", then VIEW AS to respond as see how the registration process looks
- REIGSTERED - Once you've registered you'll be prompted to pay if the price is finalized, use Direct Payments to test out a "fake payment" and see how the emails look
- PAID - Once you've paid the People section will appear so they can see who else is going.
You’re now ready to roll your trip out. 👍
Want more details on publishing your trip? Follow our Publishing a Trip Checklist here!
Need more help?
Schedule a 1:1 Consult with one of YouLi experts, and we will review your trips with you, plus provide valuable advice on how to help your brand stand out.