
It's easy to create your first trip! You can watch the video or follow the checklist below.
Watch this Video
Follow this Checklist
Follow this checklist to get started and share your itinerary with the world or with your private audience.
TIP: Need branding? Follow our quick and easy guide to set up your account.
Step 1: Create a Trip
Unlimited itineraries & Trip Pages are available with any plan. Learn more about other plans
In order to share a TRIP PAGE with your customers to book and pay for your trips, you need to "CREATE A TRIP". You can then embed this into your website.
SUGGESTION: Check the Quick Start Guide Video to get a quick look at all the things we will cover in more detail through this checklist.
You can start your trip creation by:
- Using the default template "JORDAN FOR THE ADVENTUROUS" pre-made trip in your account - use this template to build your own trip, or even just go there to explore what a finalized trip looks like.
- OR, if you’re feeling confident and have your itinerary ready click on
- ACCOUNT > TRIP DASHBOARD > CREATE TRIP
- And follow the prompts to set up your TRIP
NOTE: Don't worry! You can update everything you choose later by clicking on UPDATE TRIP, so nothing you set at this stage is final.
Step 2: Trip Overview
Update Banner Image
Your banner is the first thing travelers will see! Just click on the image in the top left corner of the trip. You can:
- Upload your own image; OR
- Select from a large library of FREE images thanks to UNSPLASH, just search using keywords.
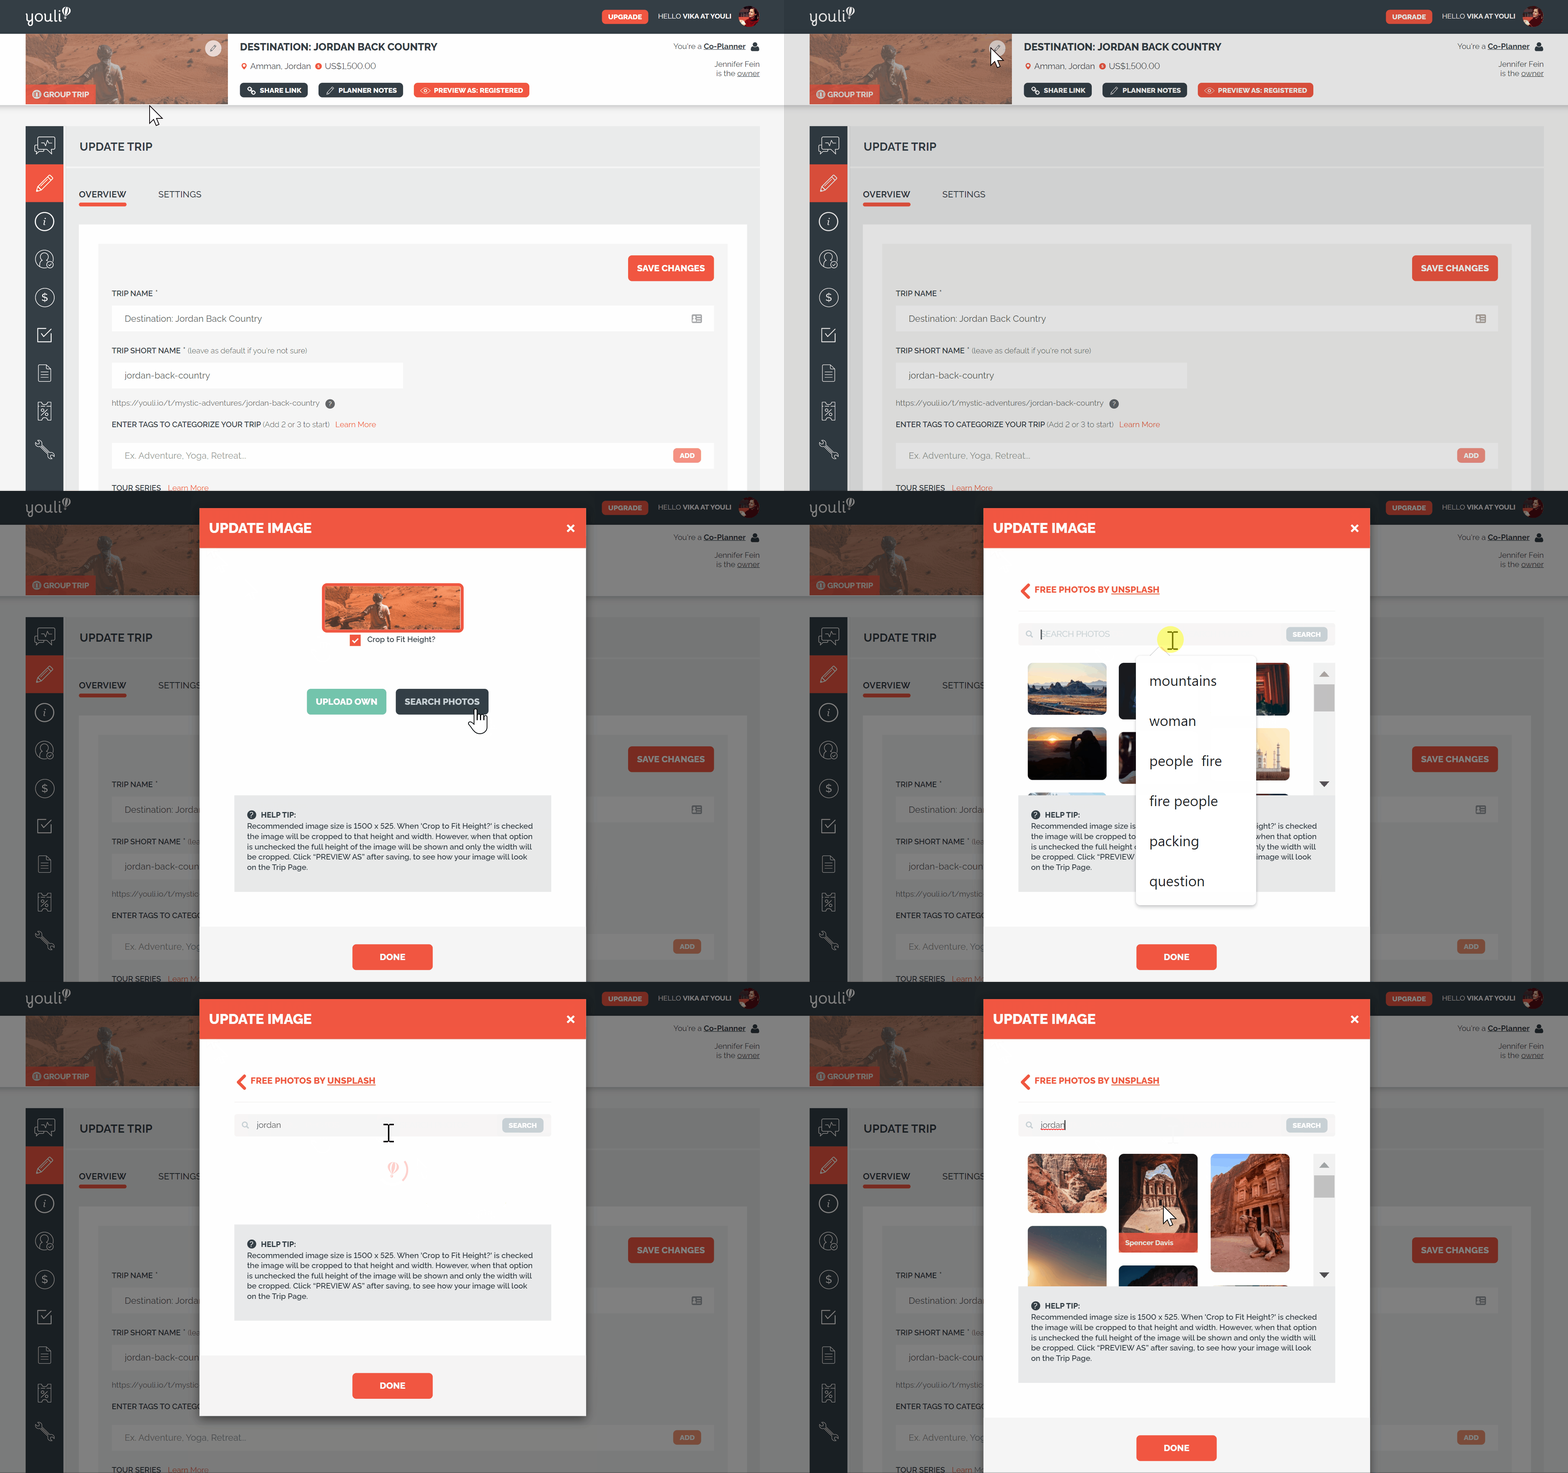
Trip Name and Trip Short Name
- Trip Name: The full name Travelers see.
- Trip Short Name: Used in the Trip Page URL.
The Trip Short Name is created automatically from the Trip Name. Leave the default value if you are not sure.
IMPORTANT: Changing the Trip Short Name can change the Trip Page URL. Review any links you have already shared before updating it.
Tags
Add two or three Tags to categorize your Trip.
Tags can help you:
- Organize Trips on your Dashboard.
- Filter Trips embedded on your website.
- Group Trips by destination, theme, audience, or experience.
Use consistent Tags across similar Trips.
Tour Series
Use a TOUR SERIES to connect Trips and Templates that belong to the same program or collection.
After assigning a Tour Series, you may also be able to select:
-
Pre-Tour: An optional Trip that ends before the current Trip starts.
-
Post-Tour: An optional Trip that starts after the current Trip ends.
Pre-Tours and Post-Tours can be offered as part of a supported Reservation workflow.
Trip Privacy
Choose who can access the Trip Page:
-
Private: Only invited people can access the Trip using a Magic Link.
-
Public: Anyone with the Share Link can view the Trip Page and register.
-
Listed: The Public Trip can also appear on supported Affiliate pages, PRO+ Websites, or websites using YouLi embed code.
-
Pre-Approved: Requires an eligible authentication and Checkout configuration.
A MAGIC LINK is personalized for a specific Traveler. It can provide access without requiring the Traveler to enter a password.
IMPORTANT: Only send a Magic Link to the correct Traveler.
Primary Location
Add the Trip’s main location or paste a supported map link.
Select SHOW MAP ON TRIP PAGE if you want Travelers to see the location on the Trip Page.
Itinerary Items can have their own locations, so use Primary Location for the main destination.
Trip Dates
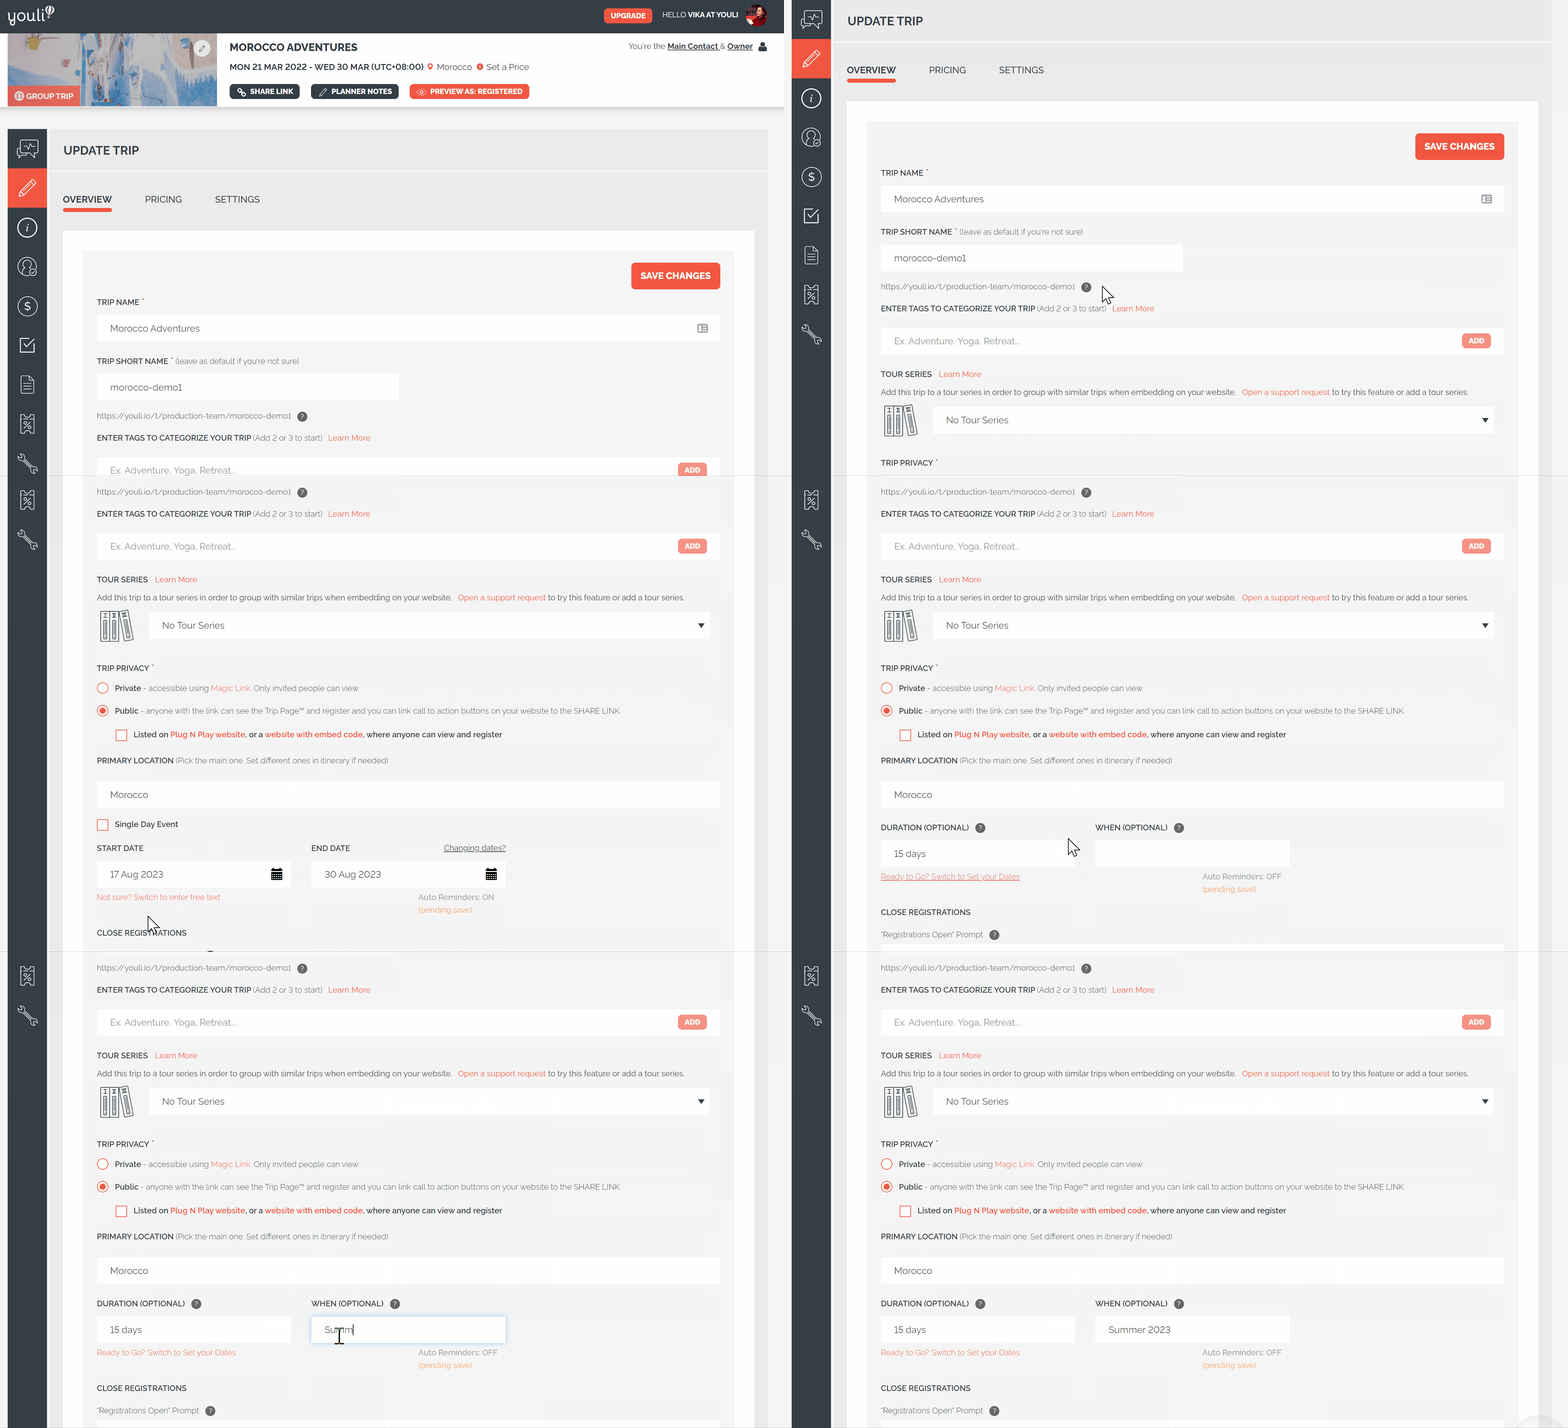
Enter the Start Date and End Date. For a one-day Trip, select SINGLE DAY EVENT.
If your dates are not confirmed, select NOT SURE? SWITCH TO ENTER FREE TEXT and enter a general period, such as:
-
Dates coming soon
-
Summer 2027
-
September 2027
Once you confirm the dates, switch back to formal Start and End Dates.
NOTE: Updating Trip dates may affect Itinerary dates, due dates, and automated reminders. Review the related dates after making a change.
Close Registrations
Use this section to control when registration closes.
Configure:
-
Registrations Open Prompt
-
Close Date
-
Close Time
-
Registrations Closed Message
The [CloseDate] shortcode automatically displays the configured closing date.
Use the Registrations Closed Message to tell Travelers what to do next, such as contacting the Planner or joining a Waitlist.
Trip Time Zone
Choose the primary Time Zone for the Trip.
This affects Trip dates, registration closing times, and other time-based features. It may be different from your personal Account Time Zone.
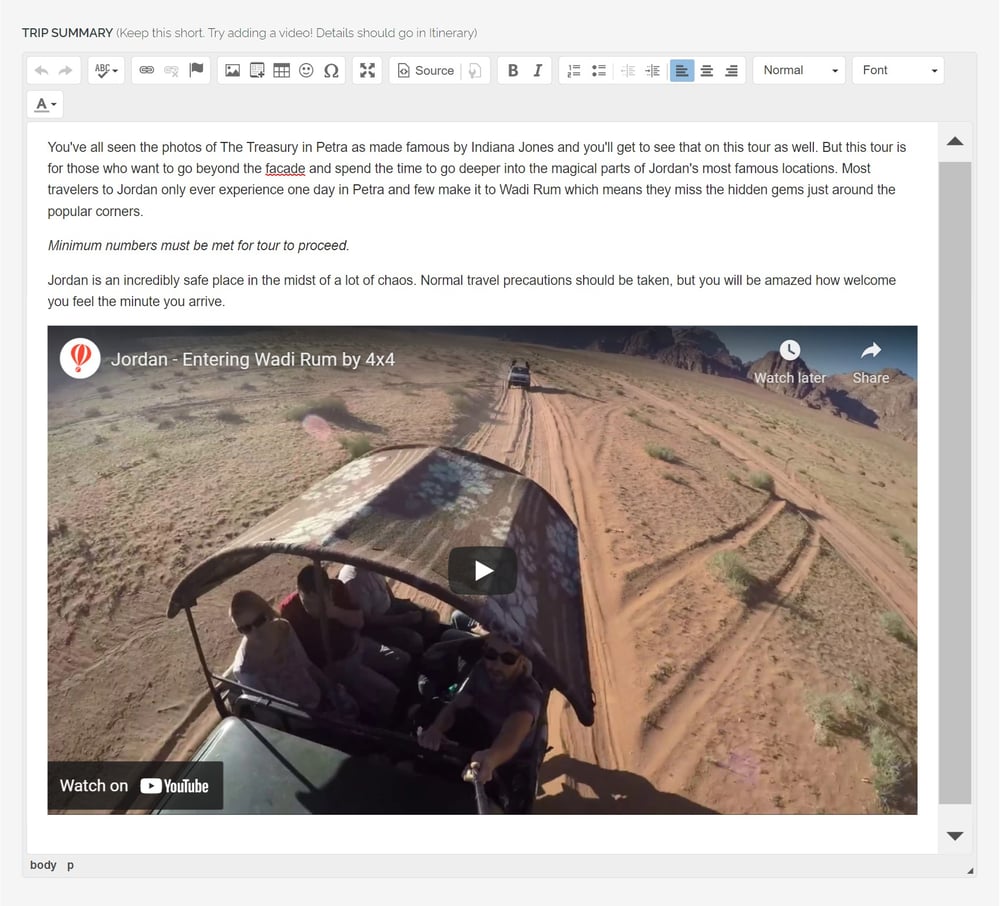
Trip Summary
-
Trip Summary Heading: The heading shown above the summary.
-
Trip Summary: A short introduction to the Trip.
Keep the Trip Summary concise. Explain the overall experience and place detailed daily information in the Itinerary.
You can add formatted text, links, images, or supported video content.
Look for this symbol in the bar to add video:
Travefy Itinerary Embed Code
If you use Travefy, paste the supported itinerary embed code into this field. Only paste the requested embed code that starts with the supported HTML format.
Share Summary
Write a short summary for sharing, search results, and other supported previews.
Make it clear and engaging. Include the destination, type of experience, and ideal Traveler when relevant.
Click SAVE CHANGES.
Step 3: Add Highlights and Itinerary Items
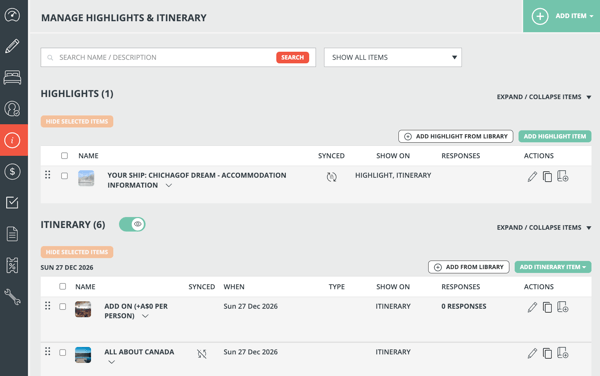
Click on MANAGE HIGHLIGHTS & ITINERARY.
"JORDAN FOR THE ADVENTUROUS" default TRIP TEMPLATE includes an itinerary you can use for inspo (Aussie for inspiration) that demonstrates OPTIONAL ITEMS.
Highlights
HIGHLIGHTS show the most attractive parts of your Trip.
Use Highlights for:
- Key experiences
- Important destinations
- Accommodation features
- Major inclusions
- Reasons to join the Trip
Highlights focus on the image and experience rather than a specific date.
- ADD HIGHLIGHT FROM LIBRARY to reuse existing content.
- ADD HIGHLIGHT ITEM to create a new Highlight.
Itinerary Items
TIP: Turn off the eye icon to hide all itinerary items from your travelers while you’re building the trip.

ITINERARY ITEMS provide the detailed day-by-day plan.
Use them for:
- Activities
- Meals
- Accommodation
- Transport
- Meetings
- Free time
- Arrival and departure information
Select:
- ADD FROM LIBRARY to reuse an existing item.
- ADD ITINERARY ITEM to create a new item.
TIP: You can create a BROCHURE ITINERARY without dates and when you set your trip dates, the itinerary will update automatically! Too Easy!
Drag and drop an item to change its date or order.
Library and Synced Items (Sponsered Feature)
Items added from the Library may display a SYNCED status.
Library Items help you reuse the same content across multiple Trips. Before editing a synced item, confirm whether the change applies only to the current Trip or to the reusable Library content.

Optional Add-ons
An Itinerary Item can also be configured as an optional paid Add-on. Use an Add-on when Travelers can choose an extra activity, service, or experience. Learn more about the Add-on prepaid prior to the Trip.
Review:
-
Price
-
Per-person or supported pricing behavior
-
Visibility
-
Inventory
-
Traveler Responses
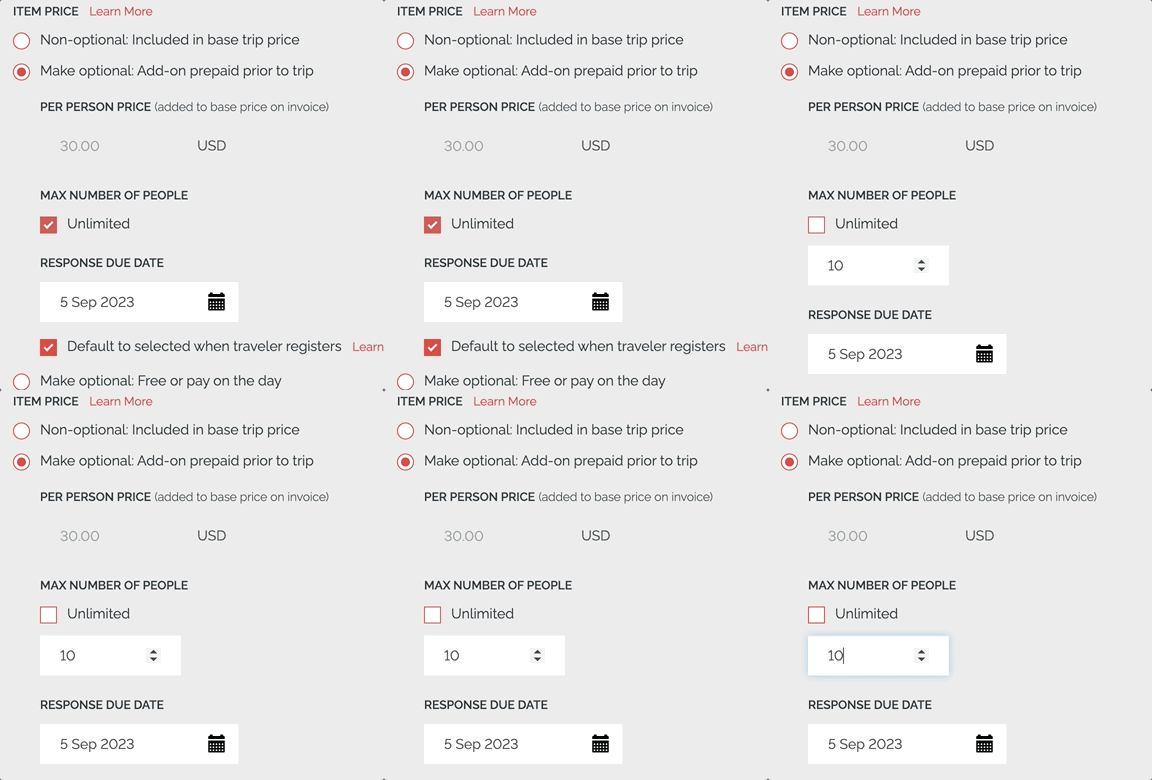
Test the item on the Trip Page before publishing.
Update Image
Don’t forget to update the image on each item. Note that images are shown differently depending on the type of item. Play around and see what works best for you. If you would like a little more support on inserting those images, watch this YouLi How-To: Add Formatting, Links, Images, and Videos to Descriptions video.
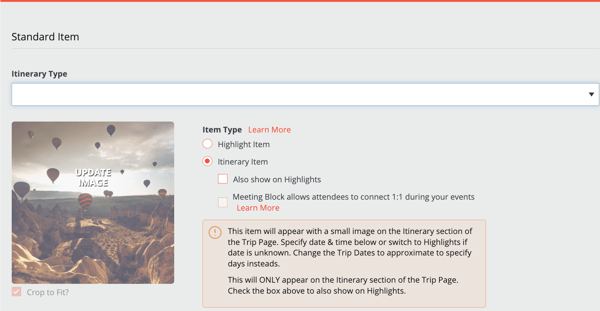
Visibility and Hidden Items
Use the visibility control to show or hide the Itinerary. You can also select individual items and choose HIDE SELECTED ITEMS. Hidden Items are not deleted. Use LOAD HIDDEN ITEMS to review or restore them.
Step 4: Set Up Pricing and Payments
Go to UPDATE TRIP > PRICING or Click on the PRICE in the header next to the $ icon.
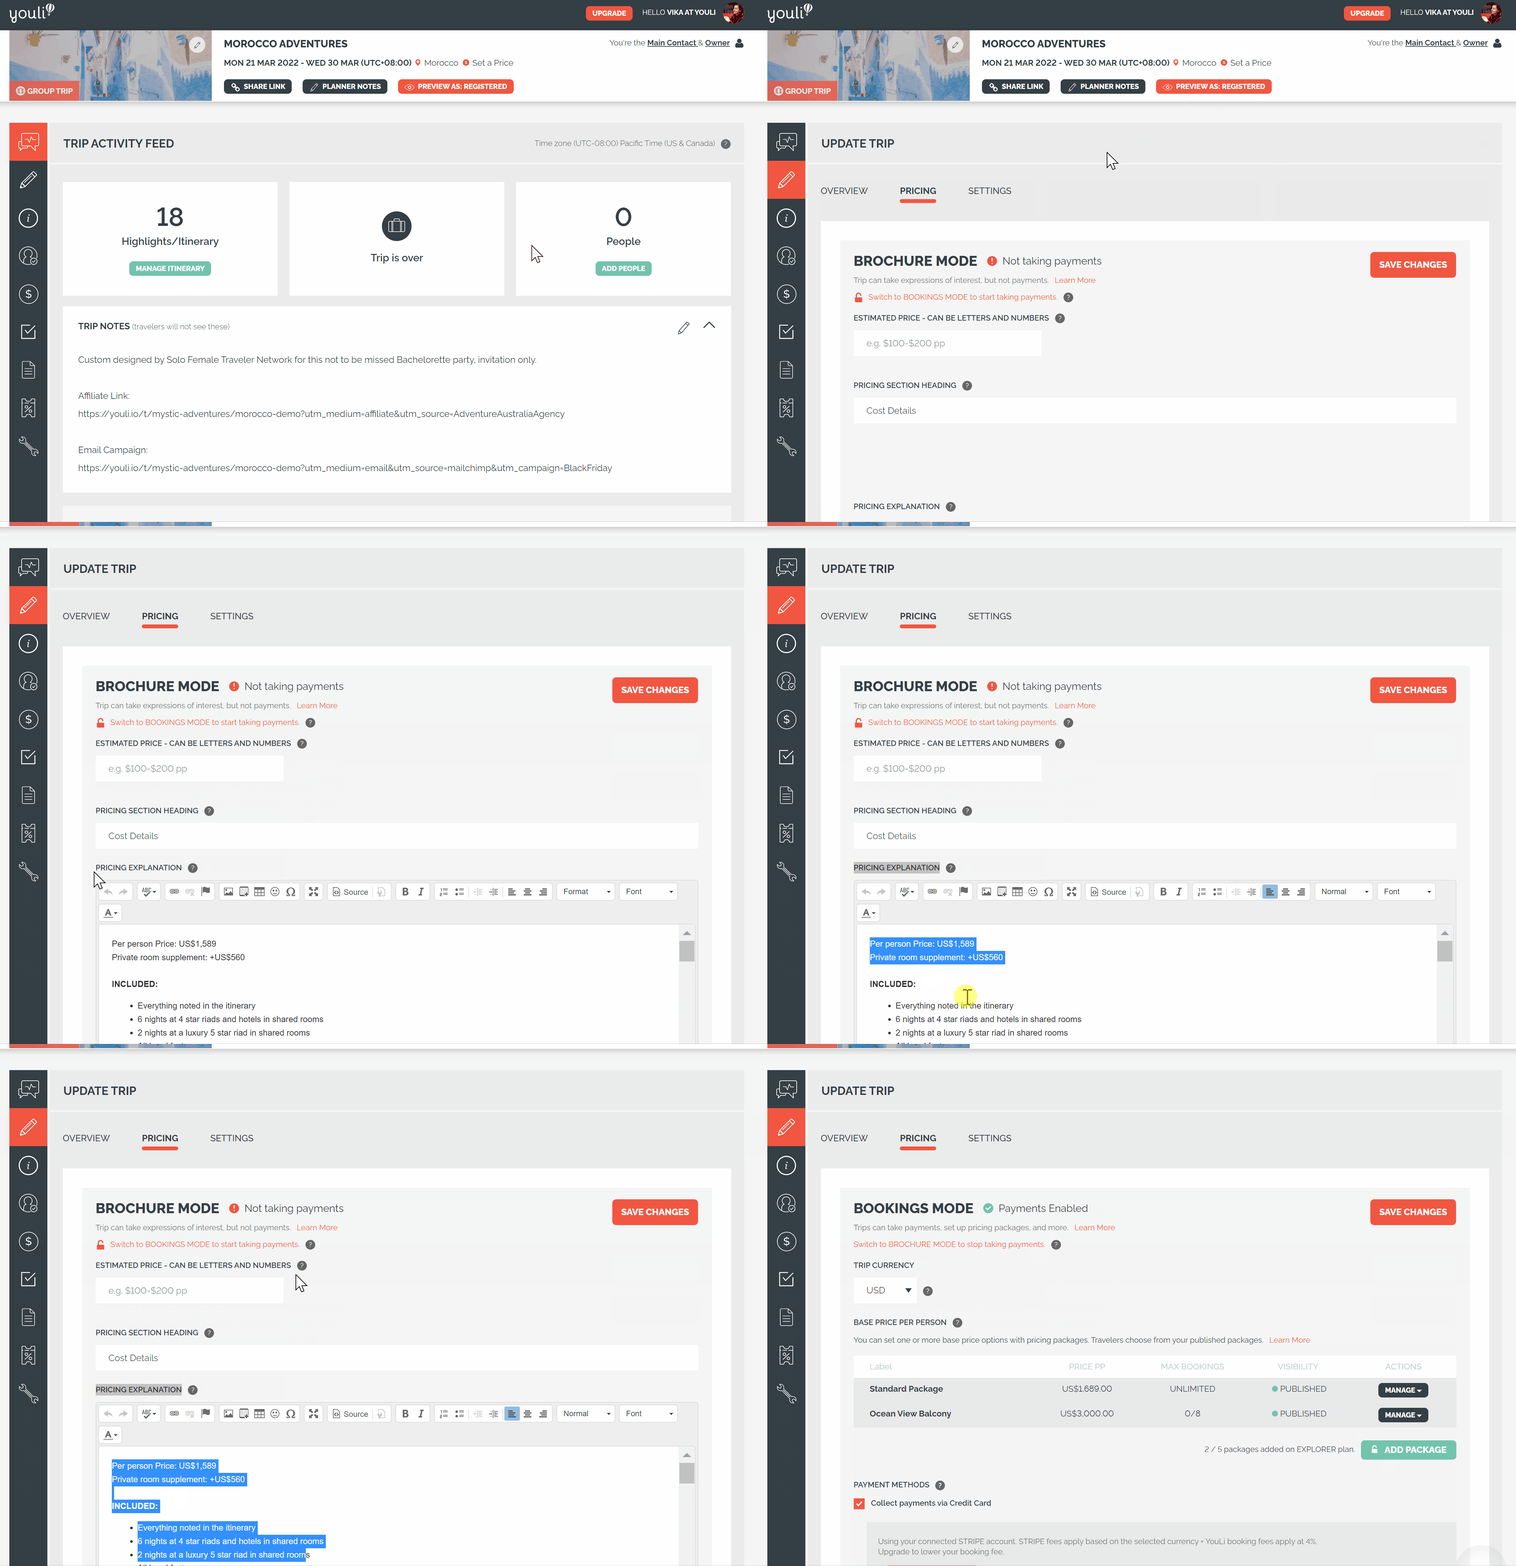
Choose Brochure Mode or Bookings Mode
- BROCHURE MODE: Use this when you want to display the Trip or collect interest without accepting payments.
- BOOKINGS MODE: Use this when you are ready to create Packages, accept bookings, and collect payments.
You can switch between these modes, but always preview the Traveler experience after making a change. Learn more
Pricing Section Heading and Explanation
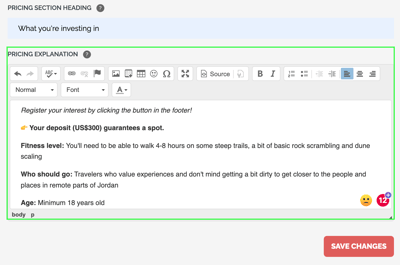
Use the PRICING SECTION HEADING to name the payment and cancellation area shown to Travelers. Learn more about How-to: Update Your Pricing Section Heading & Pricing Explanation
Use PRICING EXPLANATION to explain:
- What is included
- What is not included
- Package differences
- Payment terms
- Cancellation terms
- Important payment instructions
Keep this information consistent with your Terms & Conditions.
This PRICING EXPLANATION information will appear in the Traveler Invoice Page once a Traveler has made at least one payment. It will also appear on the Traveler’s payment receipt and personal PDF confirmation.
NOTE: If you enable Personalized Price, it will automatically apply to the explanation section by default, and it will appear under that person's payment record as Cost Explanation.
Specific Explanation For This Traveler:
Choose the Booking Flow
In Bookings Mode, select the Booking Flow that matches your sales process. For example:
- Checkout Flow: The Traveler registers, selects a Package, and makes a payment before accessing their Personalized Trip Page.
- Register to Pay: The Traveler registers first and can review payment options afterward.
The Booking Flow affects registration prompts, Package selection, authentication, and the payment experience. Learn more about How-to: Choose the Right Booking Flow.
Trip Currency
Choose the currency used for Packages, payments, invoices, and payment schedules.
IMPORTANT: Confirm the Trip Currency before accepting payments. Changing currency after payments have been collected can cause accounting and Traveler communication issues.
Pricing Packages
A PRICING PACKAGE is a booking option Travelers can select. Package limits depend on your YouLi plan.
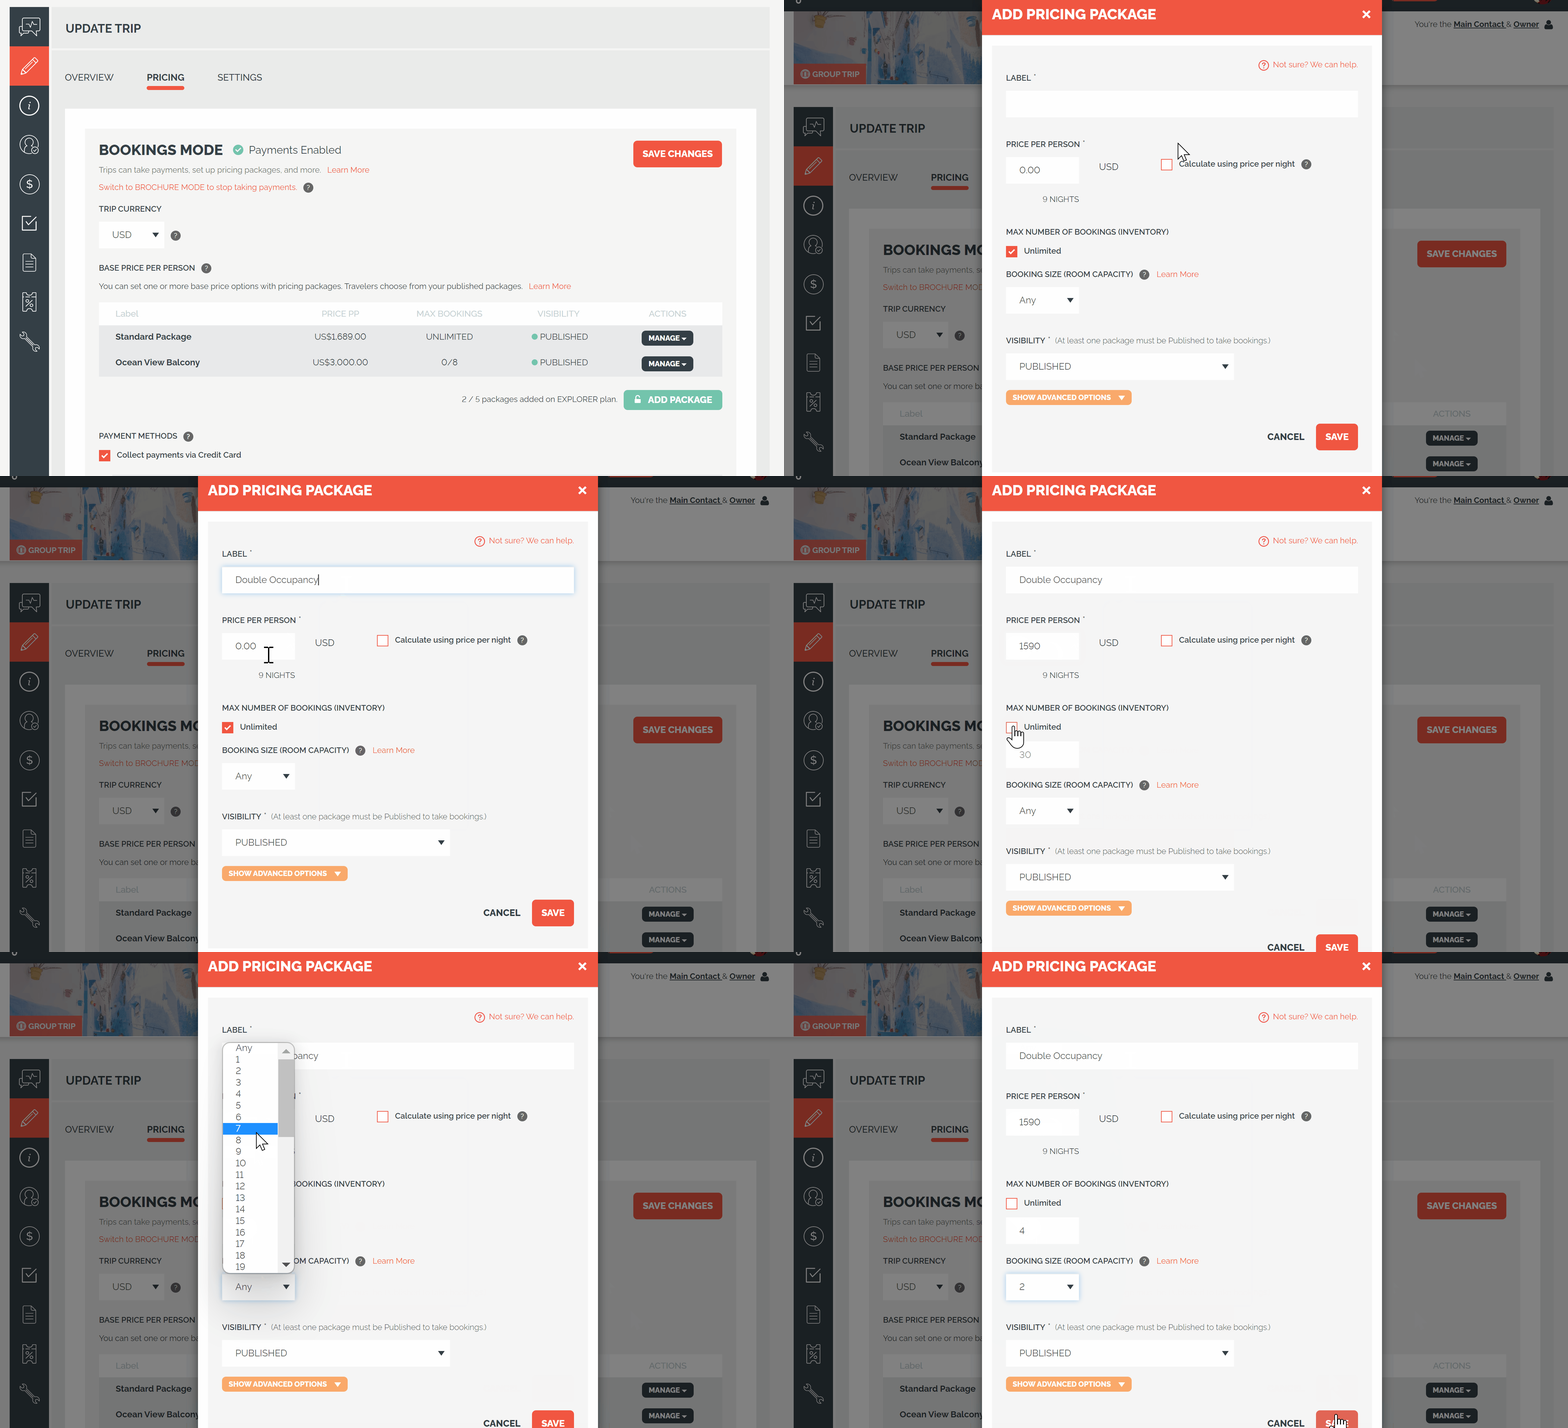
Packages can represent:
- Room type
- Occupancy
- Traveler type
- Service level
- Experience
- Group or category
Each Package can include:
- Label
- Pricing Mode Learn More
- Price Per Person
- Room Inventory
-
Visibility
-
Advanced Option
-
Description
- Hide pricing in package selection Learn More
-
Use ADD PACKAGE to create another option.
Auto Sort and Manual Sort
Packages may begin in AUTO SORT MODE. Drag and drop a Package to switch to Manual Sort Mode and control the order shown to Travelers.
The first package in the list is the default selection in the Package field. In Auto Sort Mode, this is typically the cheapest package. This applies when a Planner manually adds Travelers and when a Traveler views the Checkout or Trip Page to register interest.
Minimum and Maximum People

Set the minimum and maximum number of people allowed to book the Trip. These limits include supported $0 bookings.
Use this setting for the overall Trip capacity. Package Inventory can be used for limits on individual Packages or room types.
Sold Out Options

Choose what happens when the Trip reaches capacity. Depending on your configuration, you can:
- Block new bookings.
- Use a supported Waitlist option.
Review the full booking experience before promoting a Waitlist. Learn more
Booking Add-on

A BOOKING ADD-ON requires the Traveler to select and pay for one supported option during Checkout.
Use this for a mandatory item that is separate from the selected Package.
This setting applies to supported Checkout Flow configurations.
Payment Methods
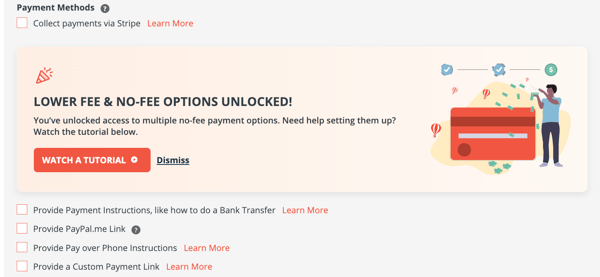
Available options depend on the Account payment setup. Enable the methods Travelers can use. Options may include:
-
Stripe
-
Bank Transfer Instructions
-
PayPal.me Link
-
Pay over Phone Instructions
-
Custom Payment Link
Stripe
When Stripe is connected, you can:
-
Collect supported online payments.
-
Open the Stripe Dashboard.
-
Customize the payment prompt.
-
Enable Stripe Adaptive Pricing when available.
STRIPE ADAPTIVE PRICING can allow Travelers to view or pay using a supported local currency. Review the Stripe conversion and settlement behavior before enabling it.
Best way to pass on your fees depending on your country: including technology costs and payment processing for credit cards or ACH. Surcharging is not always allowed, so we give you convenient options. Absorb Fees, Pass on a Convenience Fee or Surcharge
YouLi Booking Fees and Stripe merchant fees may both apply. Learn more about How-to: Connect Your Stripe Account to YouLi.
Bank Transfer
Enable Bank Transfer when Travelers can pay directly to your business bank account. Bank transfers happen outside YouLi. An authorized Planner must record or mark the payment as received. Learn more about How-to: Accept Direct Payments | Bank Transfer.
Payment Schedule
Use the Payment Schedule to create:
- Deposit
- Installments
- Balance Due
Select ADD PAYMENT INSTALLMENT to add another scheduled payment. Learn more about How-to: Provide a Payment Plan Using Installments With Automated Reminders
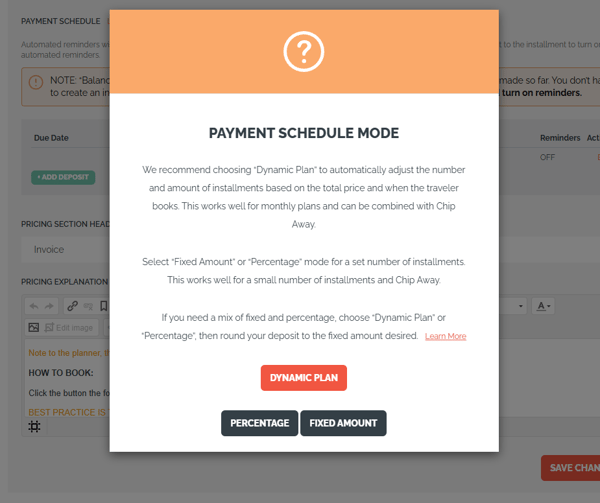 Each payment can include:
-
Due Date
-
Amount
-
Title
-
Automated Reminders
- NOTE: If your Trip does not have specific dates, reminders will be turned off. Learn more about how reminders work.
BALANCE DUE automatically calculates the amount still owing. You do not need to create a separate final Installment for the remaining balance.
Edit Balance Due to set its Due Date and reminder behavior.
Automatic Late Fees
EnableAutomatic Late Fees if overdue payments should receive the Account-level late fee. Before enabling this option:
- Review the Account payment settings.
- Confirm the amount and timing.
- Check the Traveler messages.
- Confirm your Terms & Conditions allow the fee.
Step 5: Configure Trip Page Settings
Go to UPDATE TRIP > SETTINGS.
Trip Page Style and Branding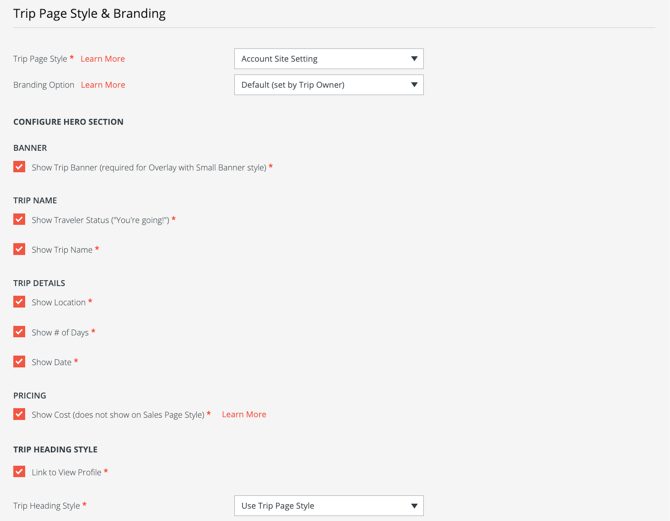
Choose the Trip Page Style and Branding Option for the current Trip. You can use:
-
Choose different Trip Page style.
-
Choose different Branding Option.
Configure Hero Section
Choose what appears at the top of the Trip Page. Turning off an item hides it from the Hero Section. It does not necessarily delete the underlying Trip data.
Trip Page Configuration
Registration Options
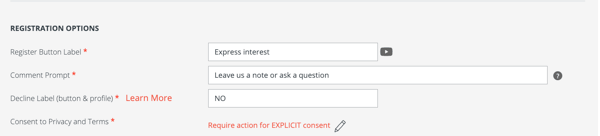
Customize Registration Form for Trips Using Trip Page Checkout Flow, Register-to-Pay, or Waitlist Checkout Flow
- Register Button Label (Trip page checkout flow / Register to pay)
- Comment Prompt
- Decline Label
- Consent to Privacy and Terms
Choose a Register Button Label that makes the next step clear.
For example:
- EXPRESS INTEREST: Suitable when collecting interest or using a registration-first process.
- BOOK NOW: Suitable when the Traveler will immediately select a Package or make a payment.
- REGISTER: Suitable for a general registration process.
If consent is required, add the appropriate Privacy Policy and Terms approved by your business.
Group & Email Domain Options

Enable Group Registrations to allow travelers to create their own groups, then click the pencil icon to edit the Group Settings.
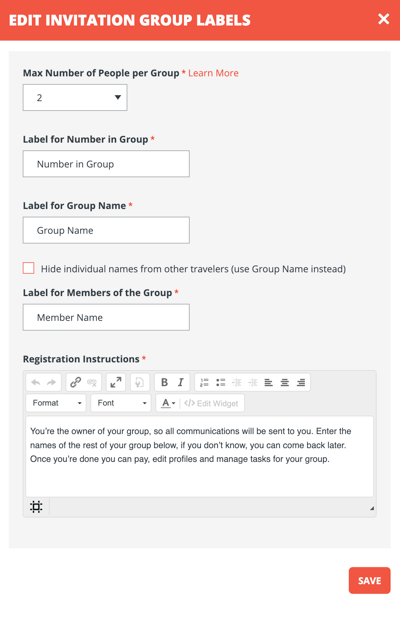
Invitation Groups can connect people who are registering, traveling, or paying together. Learn more:
How-to: Allow Travelers to Register Their Own Invitation Group
Email Domain Restrictions
For supported Checkout Flow Trips, you can require Travelers to use an email address from an approved domain.
This is useful for private corporate, school, or membership-based Trips.
Learn More How-to: Restrict Bookings to specific email domains - great for schools and corporate clients (B2B)
Register to Pay prompts (does not apply on Checkout Flow)
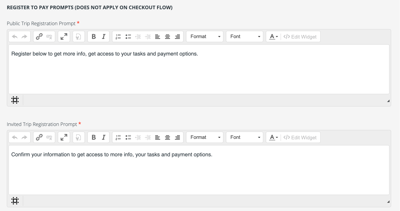
These prompts apply to REGISTER TO PAY, not Checkout Flow.
- Public Trip Registration Prompt: Shown to someone accessing the Public Trip.
- Invited Trip Registration Prompt: Shown to someone who has already been invited.
Use the prompts to explain what registration unlocks, such as Tasks, payment options, or a Personalized Trip Page.
Package and Payment Labels
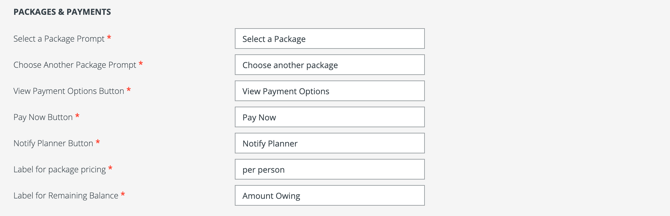
Customize the labels Travelers see, including:
- Select a Package
- Choose Another Package
- View Payment Options
- Pay Now
- Notify Planner
- Package pricing label
- Remaining Balance label
Changing a label only changes the displayed wording. It does not change the related payment behavior.
Label shown above 'Trip Name'
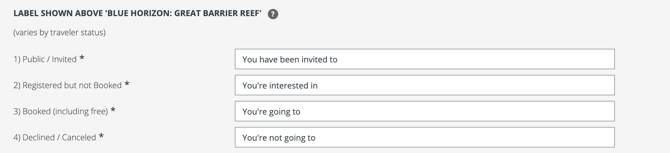
Customize the text shown above the Trip Name for each status:
- Public or Invited: You have been invited to
- Registered but not Booked: You're interested in
- Booked: You're going to
- Declined or Canceled: You're not going to
Use wording that matches the Traveler’s actual stage in your booking process.
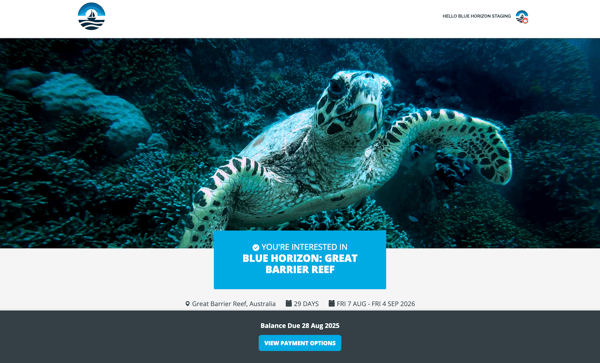
Trip Page Menu Labels
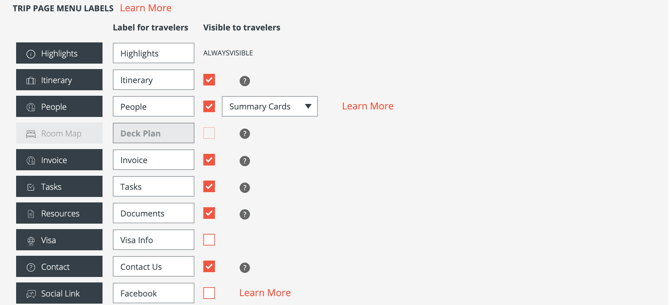
Customize the menu labels and visibility for above options.
Highlights remain visible in the displayed configuration. Other menu options can depend on Trip features and Traveler status.
The People menu may also provide supported display styles, such as Summary Cards.
👉 Learn more: How-to: Customize the Trip Page Menu
Default Email Messages
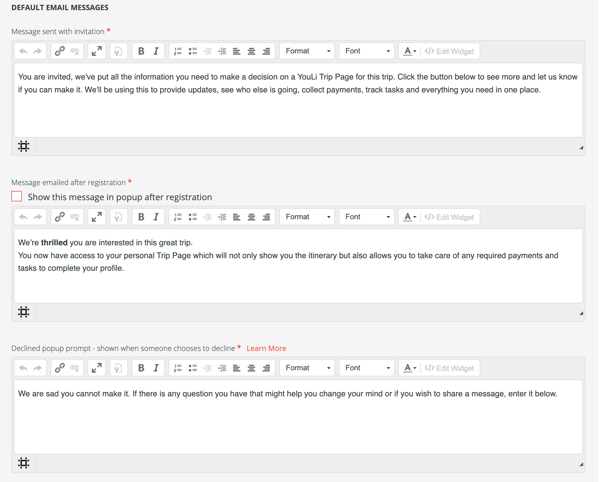
Review and personalize:
-
Message sent with invitation - this section will be included in the invitation emails
-
Message emailed after registration – This section will be included in the registration confirmation email sent to registrants.
-
If you select the Registration popup message option, travelers will also see this message on the trip page after they complete their registration or make a deposit payment.
-
-
Declined popup prompt - Shown on the trip page when someone chooses to decline, and included in the decline confirmation email.
Learn more: How-to: Use The "Decline" Feature For Invited And Registered People
Make sure these messages match the selected Booking Flow and use your business tone.
Click SAVE CHANGES.
Step 6: Add Traveler Tasks
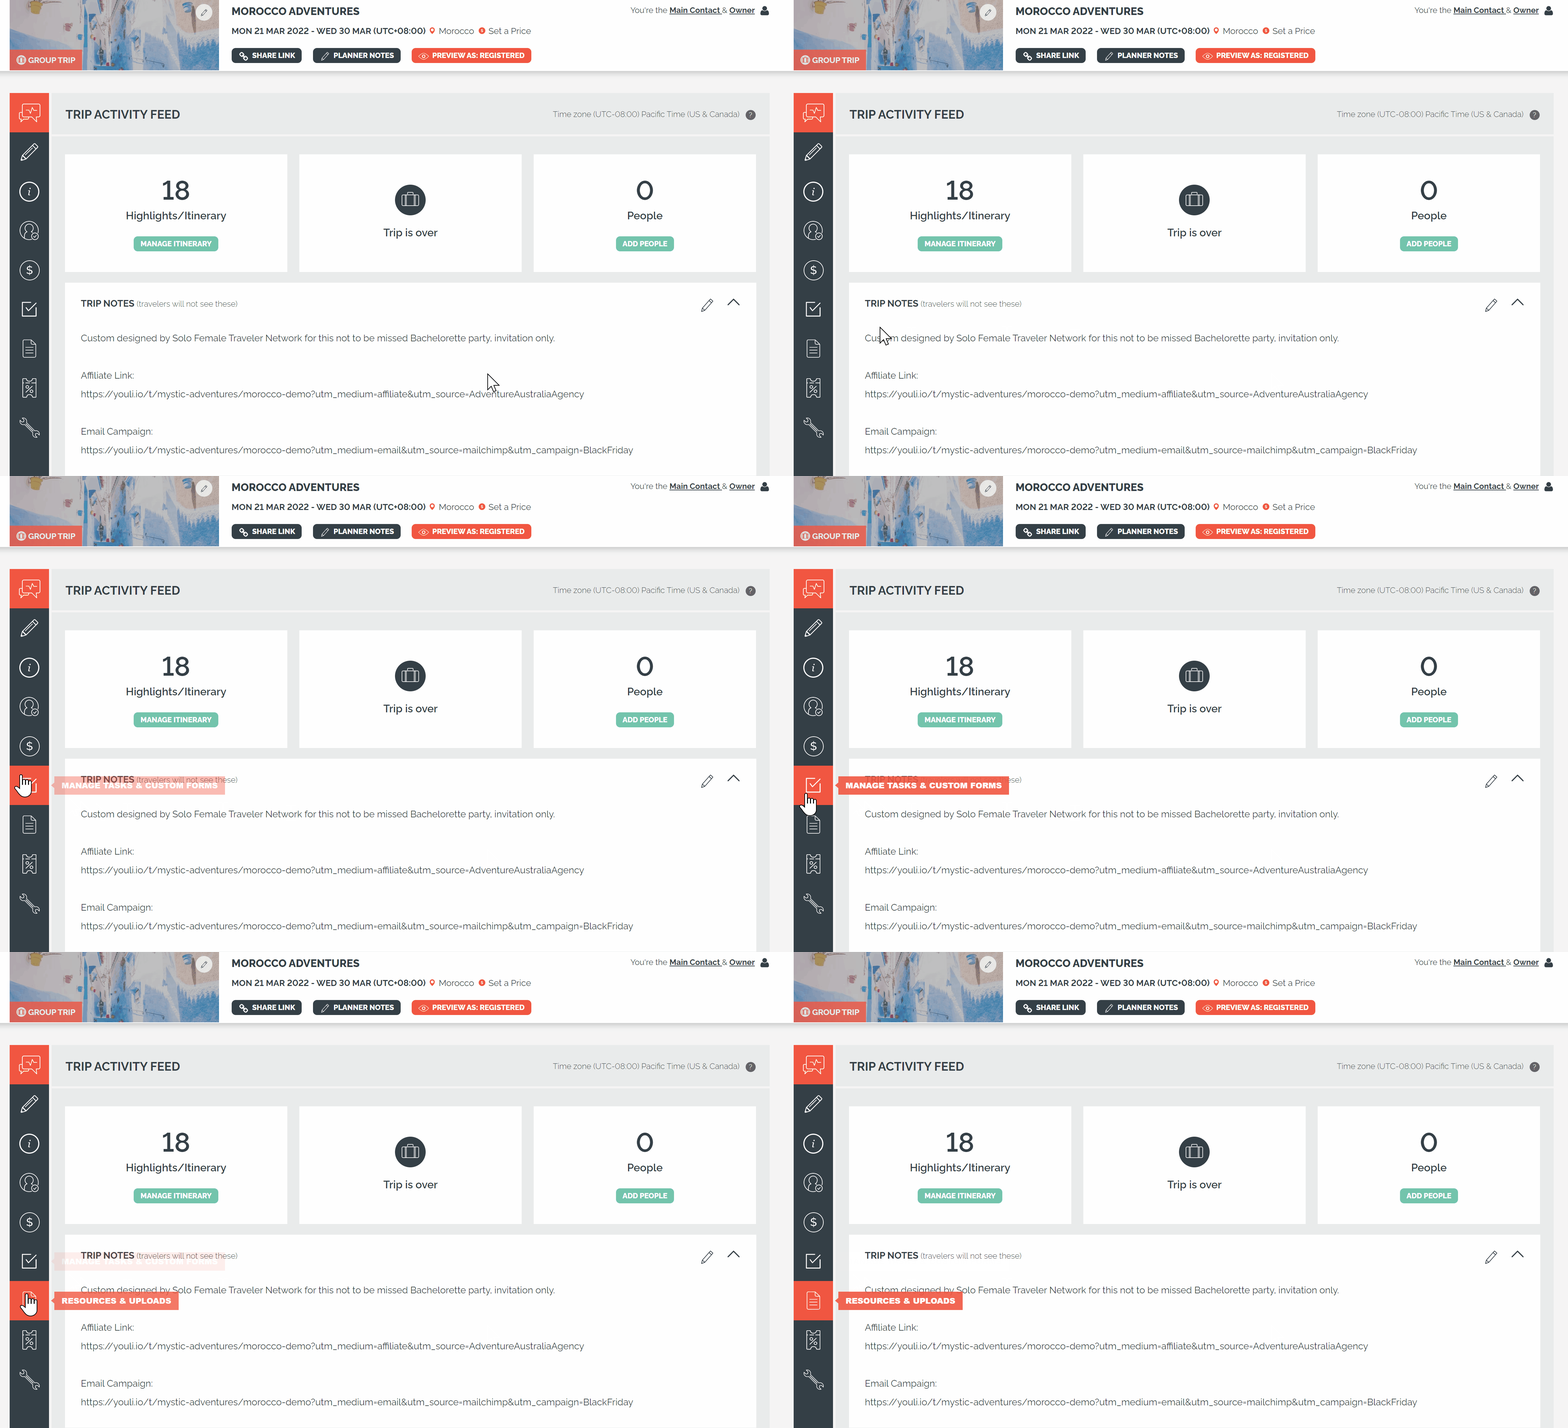
Select the checkmark icon to open MANAGE TASKS. How-to: Manage Tasks & Custom Forms + Resources & Uploads
Create a Task
Click ADD TASK to request information or an action from travelers.
The number of TASKS you can add depends on your YouLi subscription. TASK responses are PRIVATE to each traveler, so rest assured no one besides Planners (or other participants in their INVITATION GROUP) can see their responses.
Tasks can be used to:
- Collect profile and registration details.
- Request document uploads.
- Ask questions.
- Confirm an agreement.
- Provide information to read.
- Ask travelers to complete an external action.
- Track completion using a checkbox.
Set a clear name, instructions, due date, and response type.
- TASK VISIBILITY - Change the ASSIGNED TO on a TASK o pick which travelers will be prompted to complete the task, watch this YouLi How-to: Task Visibility video for a more detailed walk-through.
- RESPONSE TYPE - There are many types of responses to a task from Yes/No to full Passport details. Discover all the pre-set task responses in this video: YouLi How-to: Change the Task Response Type.
- ADD A RESOURCE TO A TASK - Sometimes you need to share a safety video with your travelers or submit passport info, right? Here is YouLi How-to: Add Resource to Task video that outlines how to add a resource (doc, vid, image) to a task (something you need your travelers to do).
- DISABLE/ENABLE TASKS FOR ONE TRAVELER - If you need to enable or disable a task for certain travelers, you can do that in the task itself. Check this YouLi How-to: Disable Task Notifications for one Traveler video for a walk-through. It also outlines how you can answer tasks for your travelers.
Add a Task from the Library
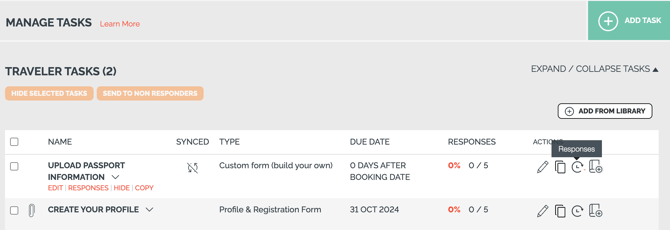
Click ADD FROM LIBRARY to reuse an existing Task.
Library Tasks are useful for requirements that apply across multiple Trips, such as passport details, emergency contacts, waivers, or app download instructions.
Check whether the Task is synced before editing it. Changes to synced Library content may affect other Trips using the same item.
Monitor responses
The Responses column shows how many travelers have completed each Task.
Use SEND TO NON RESPONDERS to remind travelers who still need to complete selected Tasks.
Hide a Task when you want to keep it saved without displaying it to travelers.
Step 7: Manage Resources and Uploads
Review Uploads from People
The Uploads from People tab contains files submitted by travelers through Tasks or other upload requests.
Use the available options to review and manage these files. Remember that uploaded documents may contain personal or sensitive information.
Add Trip Resources
Use the Trip Resources tab to provide documents and files to travelers.
Resources can include:
- Packing lists.
- Travel guides.
- Insurance information.
- PDF confirmations.
- Forms.
- Reference documents.
Confirm the resource visibility so only the intended travelers can access it.
- RESOURCES are links/documents/videos/photos that you want to share with your travelers. Resources MUST be attached to Tasks, to ensure your travelers confirm they have read them.
- UPLOADS are the documents your travelers provide to you when they complete your TASKS. Watch this overview YouLi How-to: Resources & Tasks video for more info.
TIP: Your Travelers can see resources and their uploaded files and download them in the RESOURCES section of their TRIP PAGE. You can re-label this for Travelers.
Step 8: Add Trip Coupons
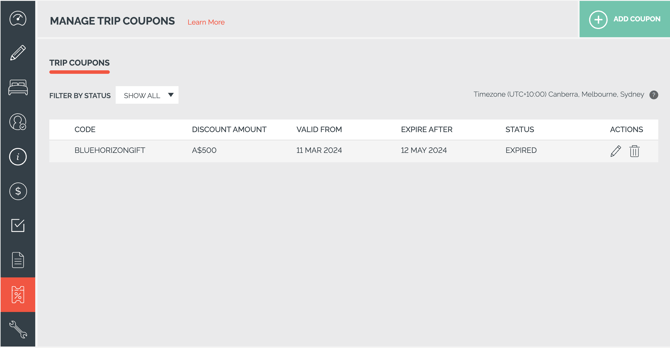
Click ADD COUPON to create a promotional or private discount for the Trip.
Set the coupon code, discount rules, eligibility, and any usage limits carefully. Test the code before sharing it with travelers.
Coupons affect the booking price, so confirm that they work correctly with your packages and payment schedule.
See more important notes about coupons: How-to: Add & Manage Trip Coupons
Step 9: Add Trip Planners
Select the wrench icon to open SETTINGS → TRIP PLANNERS.
Access depends on the user’s Account role. Review Team Roles and Trip Planner collaboration before giving someone access.
Add or manage external member
Click ADD USER to invite someone to help you plan this trip, such as a co-planner or a trip coordinator.
The Trip Planners table shows:
-
Name and email.
-
Whether the person is the Trip Page Contact.
-
Account type or role.
-
Recent activity.
-
Available actions.
Use the edit icon to update a planner’s Trip access or responsibilities.
Choose the Trip Page Contact and Main Contact
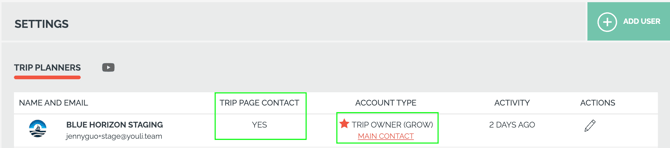
Trip Page Contact
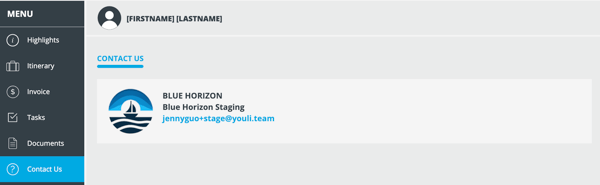
The Trip Page Contact is the person travelers see as the main contact for the Trip.
What Is a Trip Page Contact? How Do I Assign Them?
-
They will appear as a Contact for your travelers.
-
They will receive email notifications when travelers sign up, make payments, or complete tasks.
Make sure the correct planner is selected and that their Profile and contact information are complete.
Trip Main Contact
-
Travelers will receive automated emails from this user's email address. For more information, see Automated Emails.
-
Trips have a single main contact, which must be one of the internal users on the Team.
-
If you want the name of the Main Contact to show to travelers, but have a different email address used for Traveler emails, set the Traveler Contact Email
-
The Trip Owner is automatically designated as the Main Contact for a Trip, however, the main contact can be changed to another member of the Team.
-
You can change who is listed as the Contact on a Trip Page, but we do not recommend removing the Main Contact as that is who emails will be sent from for automated emails.
Step 10: Preview the Trip as a Traveler
This desktop and mobile-friendly view of your trip is called a TRIP PAGE.
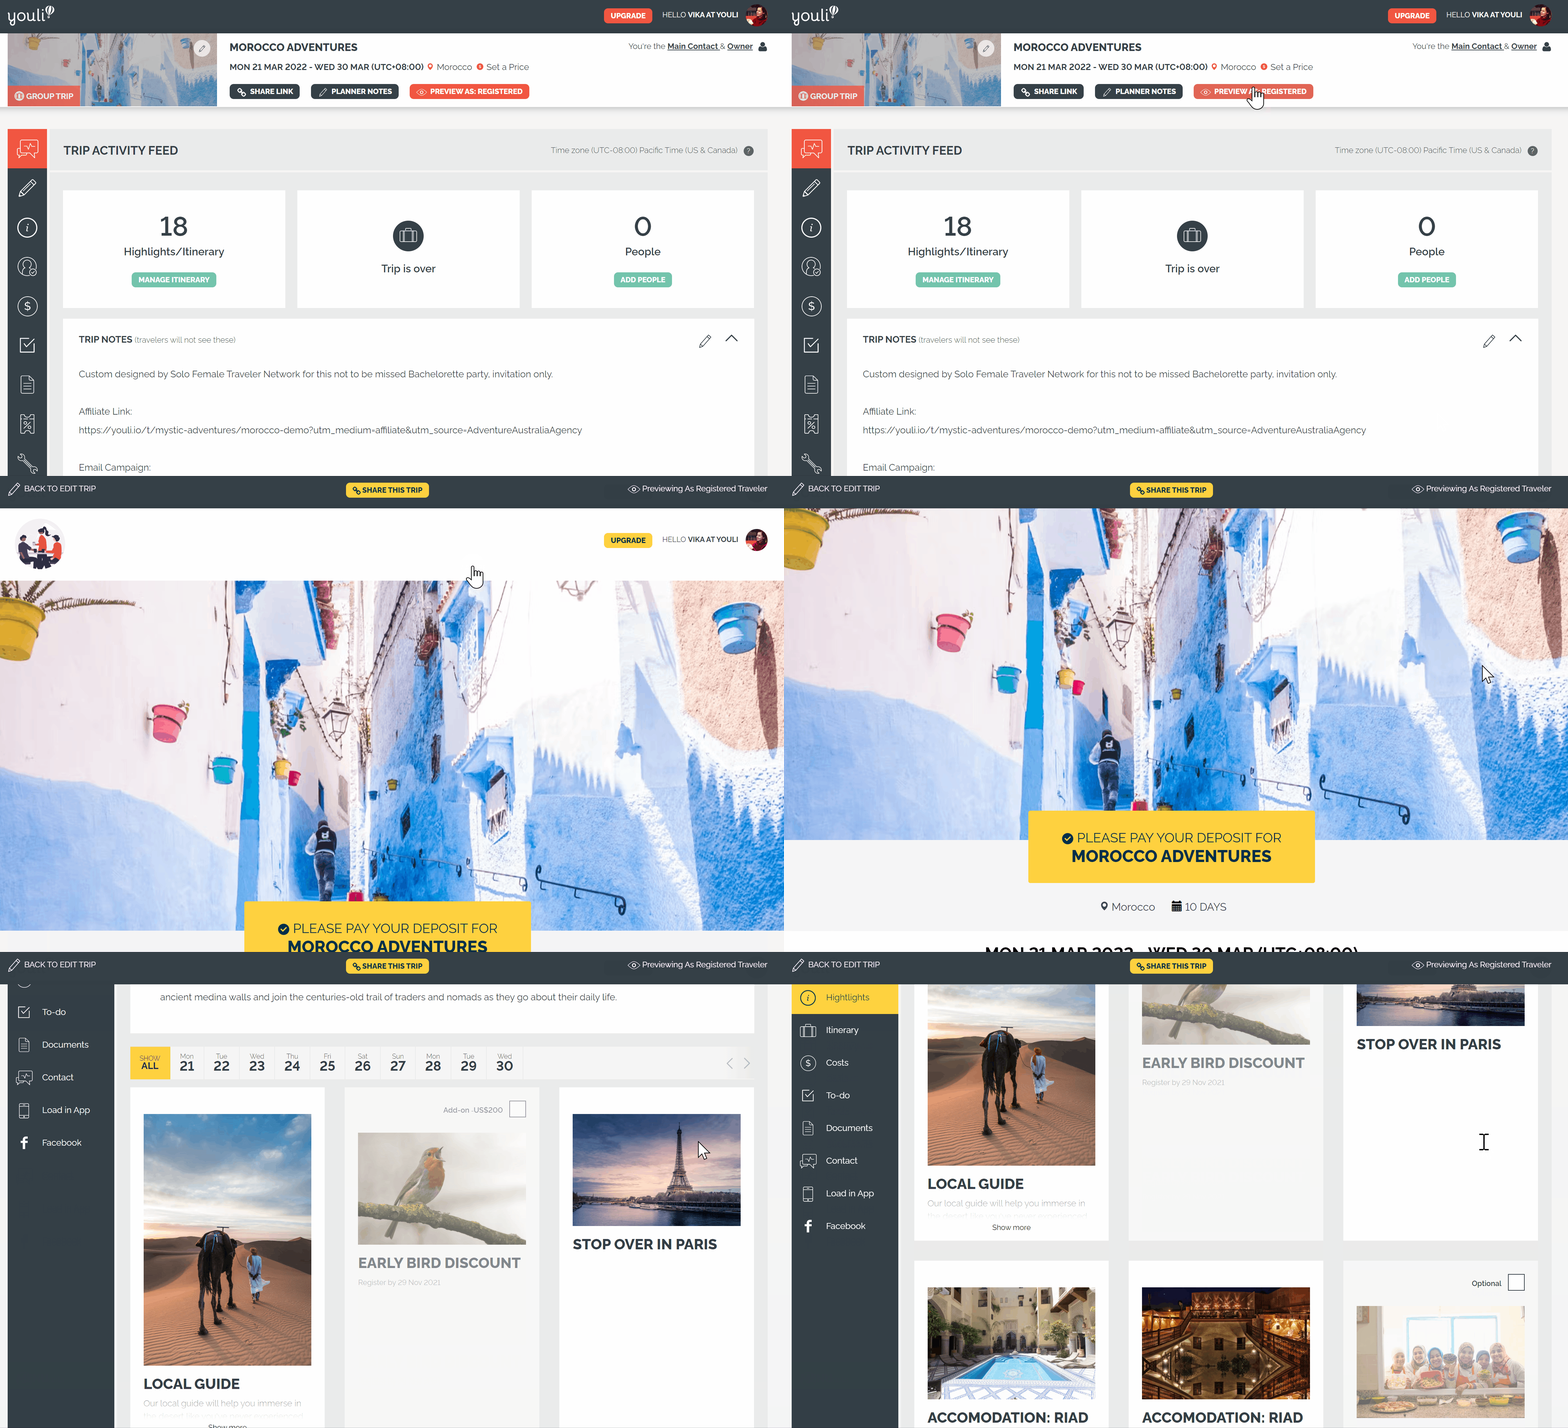
Preview your Trip at any stage to view it as a traveler by clicking ‘PREVIEW AS: REGISTERED’ in the header. The preview shows what a Registered Traveler who has not yet paid will see. You can also view as a specific Traveler by clicking the 'VIEW AS' icon from MANAGE PEOPLE tab.
Preview the public Trip Page
Open the Trip Page preview and review it as a new visitor.
Check:
-
Branding and banner.
-
Trip name, dates, and location.
-
Summary and Highlights.
-
Itinerary.
-
Published packages.
-
Registration buttons.
-
Pricing explanation.
-
Contact details.
-
Visible menu sections.
Preview a personalized Trip Page
Preview the Trip as an invited or registered traveler when possible.
Confirm that the traveler can see the correct:
-
Status.
-
Package.
-
Invoice.
-
Payment options.
-
Tasks.
-
Resources.
-
Itinerary content.
Visibility can vary by traveler status, package, Traveler Category, Invitation Group, or Trip settings.
Test the booking journey
Complete a test registration before sharing the Trip.
Test the full journey from the registration button through package selection, payment options, confirmation messages, and personalized Trip Page access.
If the Trip accepts payments, verify the payment configuration without completing an unintended live charge.
Complete the final review
Use the Checklist: Reviewing Your Trip before inviting travelers or publishing the Trip.
Once everything is correct, share the Trip link, send invitations, or display the Trip through your connected website.
- Video Appendix:
- Quick Start Guide @ YouLi Travel Experience Platform
- HOW-TO Change CTA Button Label - Drive Signups on Trip Pages
- HOW-TO Collect Deposits @ YouLi Travel Experience Platform
- HOW-TO YouLi - Resources & Tasks
- HOW-TO YouLi - Task Visibility
- HOW-TO - Change the Task Response Type
- HOW-TO YouLi - Disable Tasks and Notifications for One Traveler
- HOW-TO YouLi - Add Resource To Task
- HOWTO YouLi - Payment Options
- HOWTO YouLi - Set Individual Price for each Person
- HOWTO YouLi - Integrate with PayPal
- HOW-TO Add formatting, links, images and videos to descriptions
- HOW-TO Build the Perfect Itinerary with Program and Detailed Items
- HOW-TO Cost Explanation & Menu @ YouLi Travel Experience Platform